Creating a Staircase
Pro | Architectural | Suite
QUESTION
How do I create a staircase with an opening to the floor above?

ANSWER
Home Designer makes placing staircases fast and easy. To make it easier to see our stairs, lets tile our plan view with a 3D view.
To tile the plan view and a 3D view
- Select 3D> Create Perspective View> Full Camera
 and click and drag with your mouse to create a 3D view looking at the room where the staircase will be built.
In legacy Home Designer Suite and Home Designer Architectural products, select 3D> Create Camera View> Full Camera instead.
- Select Window> Tile Vertically
 or Tile Horizontally
  so that you can see the 3D view side-by-side with the plan view.
To make your tabs return to the normal configuration, go to Window> Tab Windows.
To create a staircase
- With the floor plan view active, select Build> Stairs> Draw Stairs
 and click, drag, and release the mouse button to create the stairs.
In this example, the staircase is intentionally drawn too short, which allows you to modify the staircase so that it reaches the second floor.

- In the floor plan view, activate the Select Objects
 tool, select the staircase, and click on the Open Object
  edit tool to display the Staircase Specification dialog.
Notice that Home Designer has detected the short staircase, and gives us a message to let us know.

- Home Designer gives us a way to automatically extend the staircase to reach the second floor. Click the Make Best Fit button, then click OK.
You can now see that the staircase reaches the next floor.

Now that you've created the staircase, open it to specification once more so that you can configure the structure of the staircase.
To adjust the staircase structure
- In the floor plan view, activate the Select Objects tool, select the staircase, then click on the Open Object edit tool to display the Staircase Specification dialog.
- For the purposes of this example, we want to have 14 treads, so move the radio button under the Advanced Options heading to Lock Number of Treads, then change the Treads value to 14.
Notice that Home Designer has updated the Length and also gives us a message at the top saying that the "Steep staircase reaches next level".

- If you change the number of treads to 18, you can see that Home Designer has detected this, and has let you know that the "Shallow staircase reaches next level".
Note: Home Designer also provides a recommended tread depth here, and can calculate all of the settings for your staircase automatically. In addition, when using the Lock features, you can customize your staircase to your exact specifications.
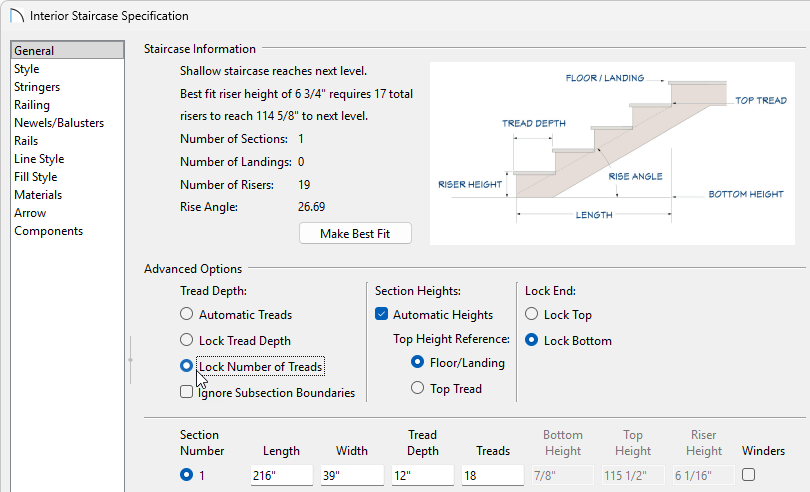
- Change the Treads back to 14 and click OK.
To move the staircase
- Use the Select Objects tool to select the staircase, and note the edit handles that display.

- Select the middle Move
 handle, and move the staircase up against the wall.

- In the 3D view, notice that a railing has been created along the wall.

Now that the staircase is configured, it's time to create the stairwell.
To create a stairwell
- In order to generate a stairwell, a second floor needs to be generated. Select Build> Floor> Build New Floor
 from the menu.
- Choose Derive new 2nd floor plan from the 1st floor plan, then click OK.

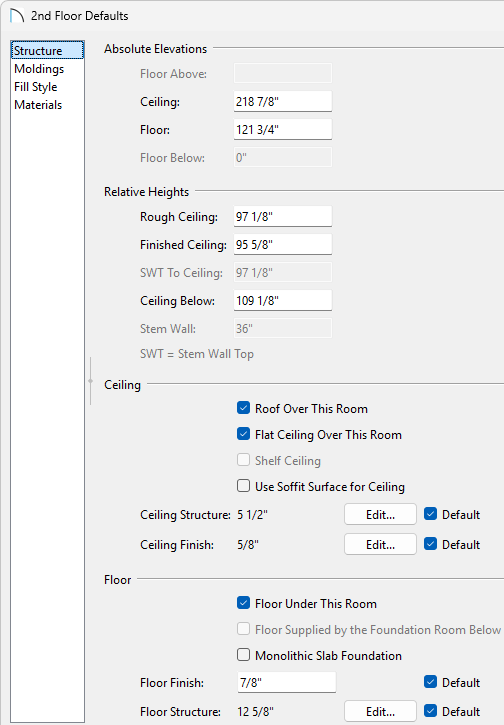
- In the 2nd Floor Defaults dialog that appears, specify your desired properties.
For this example, the preset defaults are used.
- Select Tools> Floor/Reference Display> Down One Floor
 to return to the first floor.
- Using the Select Objects tool, click on the staircase to select it, then click the Auto Stairwell
 edit button.
Note: If you do not see the Auto Stairwell button on the Edit toolbar, a stairwell may already be present, an Open Below room may already be specified above the stairs on the second floor, or the stairs don't reach the platform above.
- Now in the 3D view, see that a hole has been cut out of the ceiling.

- Close the existing 3D view, go to the second floor, and create another 3D view.
Notice that the stairwell opening has a railing around it, and there is an opening at the top of the stairs. You can select each of these railings and edit them just like any other railing in Home Designer.
You may also notice that a new room has been established titled "Stairwell". Rooms defined as such will not generate floor platforms.
