Creating a Sun Room
Pro | Architectural | Suite
QUESTION
I would like to design a sun room, solarium, or conservatory with skylights. What is the best way to do this?

ANSWER
A sun room features large windows and skylights to let in plenty of sunlight. Creating one is easy using the Skylight tool and the steps below.
To create a sun room with shed roof
- Using the Straight Exterior Wall
 tool draw your structure and sun room.
In this example, a simple 30' x 40' rectangular structure is drawn, and a 9' x 12' addition will be turned into a sun room.

- Click the Select Objects tool
 button, then click in a blank area inside the sun room to select it and click the Open Object
  edit button.
- In the Room Specification dialog that displays:
- On the Structure panel, specify the desired Ceiling height and the desired Floor height.
In this example, the Floor height is set at -7" to create a sunken room and the Ceiling height is set to 102 1/8".
Uncheck the box beside Flat Ceiling Over This Room if you would like to have a vaulted ceiling.
-
On the Moldings panel, select any moldings that you would like in the room. If you unchecked Flat Ceiling Over This Room, be sure to remove any Crown Molding.
- Click OK to close the dialog and apply your changes.
- On the Structure panel, specify the desired Ceiling height and the desired Floor height.
- Select Build> Roof> Build Roof
 from the menu, and in the Build Roof dialog that displays:
- On the Roof panel, specify the roof Pitch (in 12).
In this example, this is set to 6".
- Ensure that Auto Rebuild Roofs is checked, then click OK to close the dialog and build your roof.
- On the Roof panel, specify the roof Pitch (in 12).
- Select one of the side walls of the sun room and click the Open Object edit button.
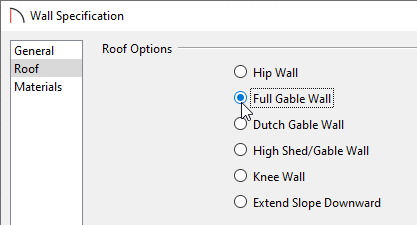
- On the Roof panel of the Wall Specification dialog, select the option beside Full Gable Wall and click OK.
Repeat this step with the other side wall of the sun room to specify it as Full Gable as well.
- Select the back wall that the shed roof will rest on and then click the Open Object edit button.
- On the Roof panel of the Wall Specification dialog, specify a Pitch (in 12) for the shed roof plane.
In this example, this is set to 2".
If the roof does not update, select Build> Roof> Build Roof, check the box beside Auto Rebuild Roofs, then click OK.
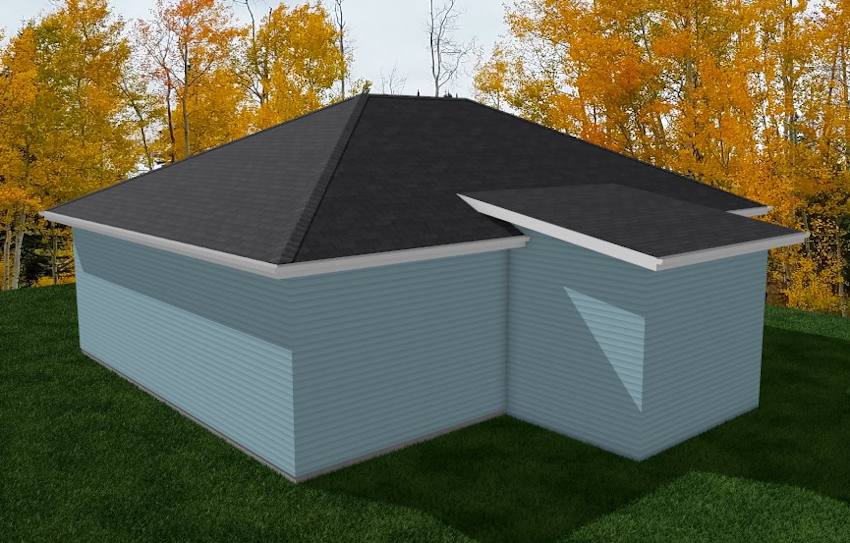
- Select 3D> Create Camera View> Perspective Full Overview
 from the menu to see the results so far.
In Home Designer Pro, instead select 3D> Create Perspective View> Perspective Full Overview .
.
To add a doorway
- Select File> Close View from the menu to return to floor plan view.
- Select Edit> Default Settings
 from the menu. In the Default Settings dialog, click on Plan, then click the Edit button.
- In the General Plan Defaults dialog that displays next:
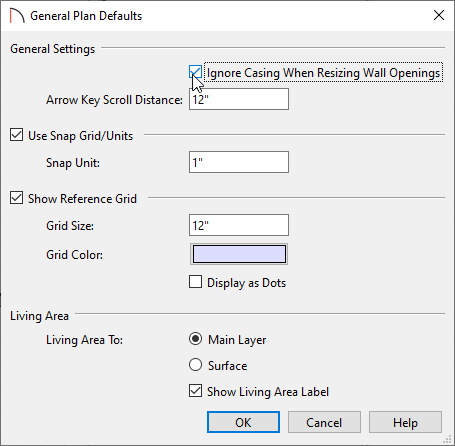
- Check the box beside Ignore Casing When Resizing Wall Openings.
- Click OK and Done to confirm the changes and close the dialogs.
- Check the box beside Ignore Casing When Resizing Wall Openings.
- Select Build> Door> Doorway
 from the menu, then click on the wall separating the sun room from the rest of the house to place a doorway at that location.
- Click the Select Objects tool, then click on the doorway to select it.
- Click the Center Object
 edit button.
- Click inside the sun room near the wall that the doorway is placed in.
- The door will become centered along the wall in the room.
- Click the Center Object
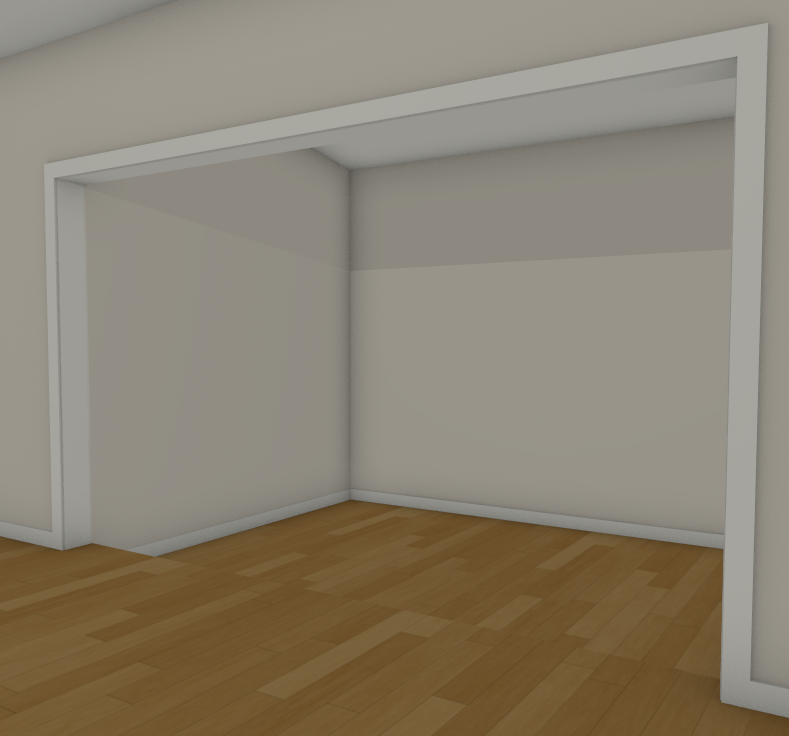
- With the doorway still selected, use the end edit handles to resize it so that it fills the entire wall section.
- You can also place a Hinged Door
 instead of a doorway opening.
- When a Hinged Door is 48" wide or more, it automatically becomes a double door.
- You can also place a Hinged Door
- Select 3D> Create Camera View> Full Camera
 from the menu, then click and drag to create a camera view inside the house looking towards the sun room.
In Home Designer Pro, instead select 3D> Create Perspective View> Perspective Full Overview.
-
(Optional) If you want, you can click on the casing, or trim, of the doorway to select it and then click and drag its edit handles to resize it or raise its top height up until it bumps into the ceiling height of the sun room.
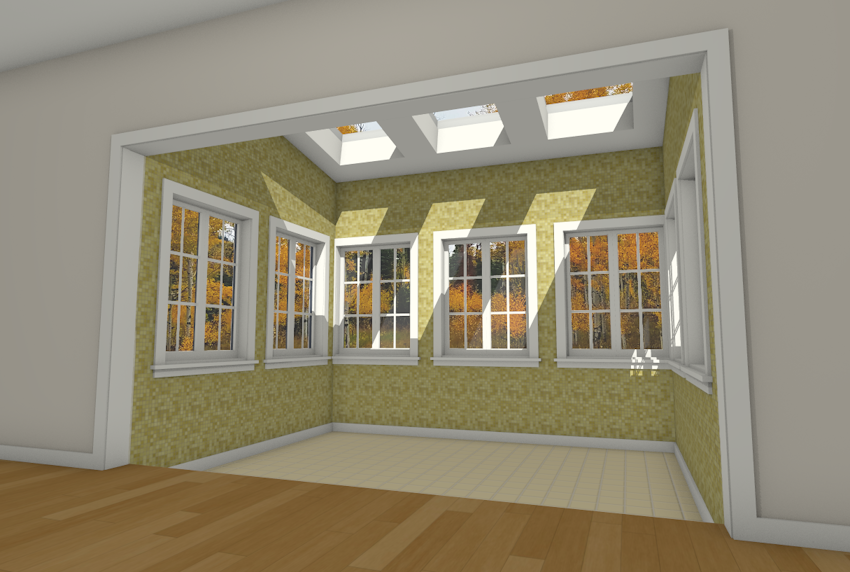
It's not uncommon for skylights to be aligned with the windows in a room.
To add windows and skylights
- Select File> Close View from the menu to return to floor plan view.
- Select Build> Window> Window
 from the menu, then click on an exterior wall to place a window at that location. Continue clicking to place as many windows as you like.
- Using the Select Objects tool, click on a window to select it and use the temporary dimension lines that display as guides to move it relative to a wall corner or another window.
The Center Object edit button can be used to center a window or group of windows along a wall inside a room. Select the window(s), click the Center Object edit button, then click inside the room near the wall that the windows are placed in to center them along that wall.

-
Select Build> Roof> Skylight
 from the menu, then click and drag to draw a rectangular skylight.

-
Be sure that it is drawn entirely within the edges of a single roof plane.
-
Don't worry about the exact size, shape or placement of the skylight as it is drawn: it can be edited precisely in a moment.
- In this example, three skylights are drawn.
-
Be sure that it is drawn entirely within the edges of a single roof plane.
- Click the Select Objects tool button, then click on the skylight on the left to select it and display its edit handles.
If you select another object such as the roof plane or the room instead, click the Select Next Object edit button or press the Tab key on your keyboard.
- Click and drag the edit handles of the skylight to resize it and move it into position relative to the walls and windows of the room. Use the temporary dimension lines that display to help you resize and move the skylight precisely.
- Repeat Steps 5 and 6 with each skylight so that they are evenly spaced.

- Select 3D> Create Camera View> Full Camera from the menu, then click and drag a camera arrow inside the house to see your work.
In Home Designer Pro, instead select 3D> Create Perspective View> Full Camera .
.
Once the structure of the sun room is designed, it's time to decorate the room using furnishings, accessories, and materials.
To decorate the sun room
- Select View> Library Browser
 from the menu to open the Library Browser if it's not already open.
- Select furniture for your room by browsing to the Interiors and Exteriors library categories.
- Browse a selection of potted plant images in the Plants library category.
- Select 3D> Create Camera View> Full Camera from the menu, then click and drag a camera arrow inside the house to see your work.
In Home Designer Pro, instead select 3D> Create Perspective View> Full Camera.
- 3D views are a great place to experiment with different materials for floors, trim, furnishings and other objects in your plan. While in a 3D view, select 3D> Material Painter> Material Painter
 from the menu.
- In the Select Material dialog, browse the Materials library to find a material that you would like to apply to an object in your plan.
- Select the material and click OK to return to the 3D view. Your pointer will display the Material Painter
 icon.
icon.
- Click on the surface of an object to apply the selected material to that surface.
- In the Select Material dialog, browse the Materials library to find a material that you would like to apply to an object in your plan.