Changing the Color or Material of a Single Wall in Home Designer
Pro | Architectural | Suite
QUESTION
I want to change the color or material of just one wall in my room to create an accent wall. How can I do this?

ANSWER
Changing the color or material of a single wall is easy to accomplish using either the Wall Specification dialog or the Material Painter tool.
Note: Although the instructions in this resource discuss changing colors and materials, it is recommended to adjust, change, or create a new Wall Type if the material that is replacing the original material has a different physical thickness (e.g. vinyl siding to brick). To learn more about Wall Types, please see the Related Articles section below.
To change the color or material of a single wall using the Wall Specification dialog
- First, use the Select Objects
 tool to select the wall, then click on the Open Object
 edit tool.
Note: You can select a Wall in either a 2D floor plan view, or in a 3D camera view, to open its specification dialog. If you are in a 3D camera view, and the entire room highlights first, click on the Select Next Object edit button, or press the Tab key on your keyboard to select just the individual wall.
- On the Materials panel of the Wall Specification dialog that displays, select the Wall Surface component that you would like to change, then click on the Select Material button.
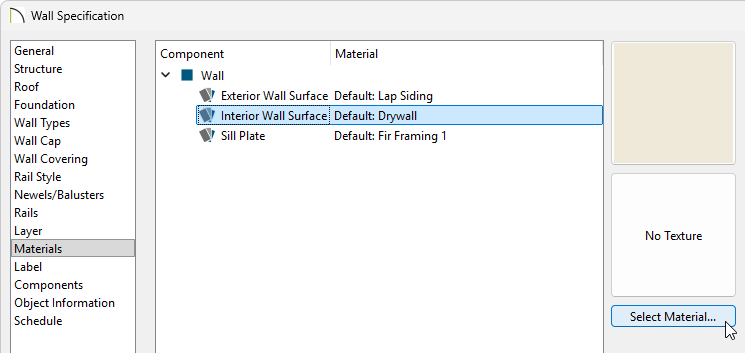
- In the Select Material dialog, navigate to the material or color you want to apply to the wall, then click OK on all of the dialogs to apply the change.
-
Take a Camera
 view to see the results.
To change the color or material of a single wall using the Material Painter
- Select View> Library Browser
 to display the Library Browser if it's not already open.
- Navigate to 3D> Create Perspective View> Dollhouse View
 so you can see the wall you wish to apply a different color or material to.
In Home Designer Suite and Architectural, navigate to 3D> Create Camera View> Doll House View instead.
- To ensure that only a single wall is changed during this process, navigate to 3D> Material Painter and make sure that the Material Painter Component Mode
 is selected.
There are a variety of different Material Painter modes available in Home Designer. To learn more about the differences between each mode, please see the Related Articles section below.
- While in the 3D camera view, access the Library Browser , search for the color or material you wish to apply to a single wall, select it, then bring your cursor into the 3D view to see the Material Painter
 icon .
- Click on a wall to apply the selected color or material to the wall.
In some cases, such as when an exterior wall runs the length of several rooms, you may not want to change the material of the entire wall. Alternately, you may want to apply different colors to several different sections of the same wall to create a striped effect. This can be accomplished by breaking the wall into separate segments.

If you are in a 3D camera view, return to your 2D floor plan view for the following steps.
To change the color or material of a section of wall vertically
- To break a wall into segments, select the wall you want to modify, click on the Add Break
 edit button on the Edit toolbar, then click on the wall to place the break point.
Note: If you would like the Add Break edit tool to remain active, you can turn on Sticky Mode in your Edit toolbar so that you can continue to place as many breaks as needed. When you are finished, choose a different tool, or press the Spacebar key on your keyboard to return to the Select Objects tool.
The Add Break tool applies a break in a wall. Once a wall is broken, the two wall segments are separate walls that can be modified independent of each other. If a break point is placed near the intersection of two walls, the break is positioned at the center of the intersection. Walls separated by a break can be rejoined. Select one of the segments, click on the end edit handle located at the break, and drag it a few plan inches (mm) away from the break.
- After you have placed the break points on the wall to create separate wall segments, use the instructions in the sections above to change the color or material on just that section of the wall.

To restore the default color or material
- On the Materials panel of the Wall Specification dialog for the wall that you'd like to restore the default material to, click on the desired component, then click on the Select Material button.
You can also navigate to 3D> Material Painter> Material Painter in a 3D view to restore the default material.
- In the Select Material dialog that appears next, check the Use default material box, then click OK.
- The default material will be restored to the selected wall, however, if you selected the Material Painter tool in Step 1, you will also need to click on the wall that you want to apply the default material to.