Creating, Moving, and Deleting Stairwells
Pro | Architectural | Suite
QUESTION
How do I create a stairwell, or opening for my stairs, in Home Designer? Also, is it possible to move or delete a stairwell after it has been created?

ANSWER
A stairwell is a vertical shaft used to contain stairs. In Home Designer, a stairwell can automatically be created using the Auto Stairwell tool, however, a staircase must first be present.
When drawing stairs, there are a few things to keep in mind:
- Before stairs are created, make sure that the heights for both the lower and upper floors are correctly defined.
- Stairs are drawn going UP, so they should be drawn from the lower of the two floors they connect.
- Stairs adjust their riser and tread dimensions to connect two floor heights if possible. The rise and run are calculated so that the steps are consistent in size.
- If you have the Reference Display
 turned on, stairs will snap to the reference display. To turn on Reference Display, from the menu select Tools> Floor/Reference Display> Reference Display
 .
.
In this article, we will discuss the following topics:
To create a staircase
- First, launch Home Designer and Open
 the plan in which you want to create a stairwell.
- If there is not already a staircase in the plan, select Build> Stairs> Straight Stairs
 .
.
Note: Other types of staircases can also be created, such as L-shaped and U-shaped stairs. To learn more about creating different kinds of staircases, please see the Related Articles section below.
- Click and drag from the beginning of your stairs drawing up to the floor above.

- If you need to adjust the position or length of the stairs after they have been created, use the Select Objects
 tool to select the newly created staircase, then use its edit handles to adjust it until it is at the correct location in your plan.
To create a stairwell
- Once you have your staircase drawn and located precisely where you would like it, select it and click on the Auto Stairwell
 edit button.
Note: There are some situations to be aware of when using the Auto Stairwell tool:
- If the staircase does not reach the next floor platform, you may be greeted with an Information message, and a stairwell will not be created. Extend the length of the staircase or open it to specification and select the Make Best Fit button to remedy this issue.
- If the Auto Stairwell tool has already been clicked or an Open Below room type already exists on the floor above, the Auto Stairwell tool may no longer appear. Simply move up to the next floor to see the defined stairwell or Open Below room.
- If the staircase does not reach the next floor platform, you may be greeted with an Information message, and a stairwell will not be created. Extend the length of the staircase or open it to specification and select the Make Best Fit button to remedy this issue.
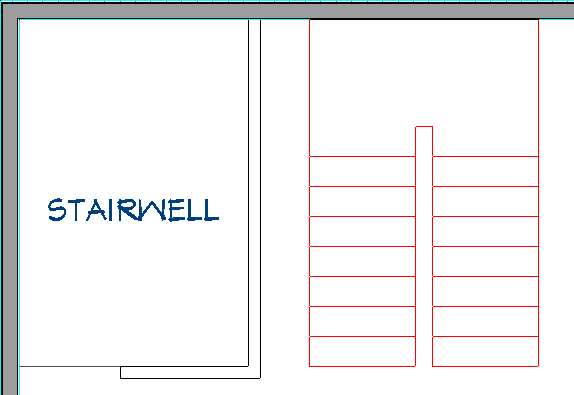
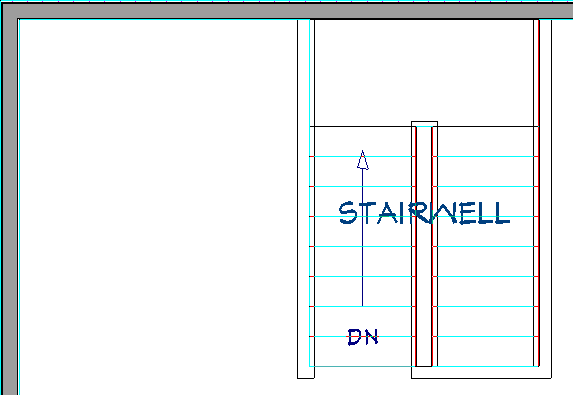
- Move Up One Floor
 to observe that a stairwell room has been created and the staircase is visible.

- You may want to create a Camera
 view of the stairwell to view it in 3D.

- With the stairwell generated, you can select and edit the railings encompassing the stairwell room to change them to solid, adjust their height, materials, or make any other desired changes, as necessary.
If the automatically generated stairwell doesn't suit your needs, you can either modify it, or manually draw a room using railings/walls. This room can be opened to specification and set to have the "Open Below" Room Type, which will remove the floor platform for the area.
To move a stairwell
- Make sure you're on the floor that the stairwell exists on, and focus on the railings/walls forming the stairwell.
- Select Tools> Floor/Reference Display> Reference Display from the menu to turn on the display of the floor below so that you can locate the staircase below.
- Select one of the stairwell railings using the Select Objects tool, then Move
 it to the correct location relative to the stairs.
- Repeat step 3 for each railing until the stairwell with its Open Below specification is properly positioned where you would like it.
To delete a stairwell
- Make sure you're on the floor that the stairwell exists on, and focus on the railings/walls forming the stairwell.
- Select each of the railings/wall that define the stairwell using the Select Objects tool, then click on the Delete
 edit tool or the Delete button on your keyboard to remove them from the plan.
- You can now move Down One Floor
 , position your staircase as needed, and create a new stairwell by selecting the staircase and clicking the Auto Stairwell edit button.