Creating a Carport
Reference Number:
KB-00908
Last Modified:
February 16, 2024
This article also applies to the following legacy products:
Pro | Architectural | Suite
Pro | Architectural | Suite
QUESTION
I need to create a carport. How can I create that in Home Designer?

ANSWER
Creating a carport, or outside structure which has a roof held up by columns instead of walls, is easy to create using the Room Divider tool.
To create a room using invisible walls
- First, launch your Home Designer software and Open
 the plan in which you would like to create the carport.
- In order to specify a roof over an area, we need to create a completely enclosed room within our plan.
- Select Build> Wall> Room Divider
 and click and drag out walls to completely enclose the area.
We could also use a Railing and then specify each one that you place as "Invisible" on the General panel of their specification dialog.
- Once we have created a room, we can use the Select Objects
 tool to select it, then click the Open Object
  edit button to display the Room Specification dialog.
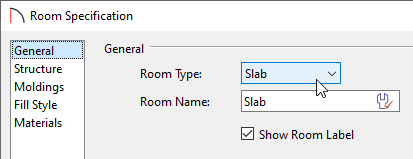
- Since our carport is not a traditional room requiring a floor, on the General panel of the Room Specification dialog, we will change the Room Type to a Slab.
- Select the Structure panel in the Room Specification dialog.
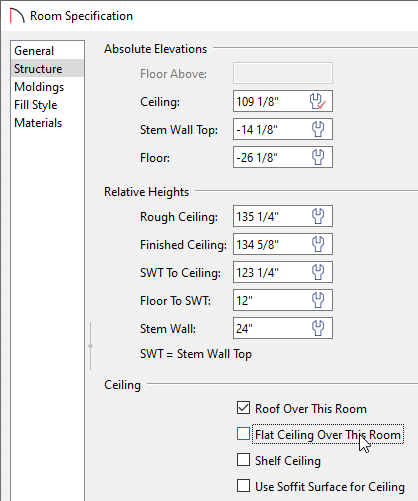
- Lower the Floor Height to so that it will be only an inch above the Terrain.
- If you only want a roof, and do not wish to see the Ceiling displayed in your carport, remove the check from the Flat Ceiling Over This Room box.
- Lower the Floor Height to so that it will be only an inch above the Terrain.
- Go to the Materials panel and set the appropriate asphalt or concrete material for the slab room's Floor Structure.
- Once you have finished making changes in this dialog, click the OK button to apply and close the dialog.
Now we are ready to manually place the columns that will hold up the carport area.
To manually place columns
- Select View> Library Browser
 to display the Library Browser if it's not already open, then navigate to Home Designer Core Catalogs> Architectural> Millwork> Columns.
Depending on the type of column that you want, you may also want to look at the Home Designer Core Catalogs> Shapes> Boxes> Closed item in the Library Browser.
- Continue browsing the library until you locate the type of column that you want to use, then select it, and click in plan view to place the column.
- Use the Select Objects tool to select the column and click on the Open Object edit button to display the Millwork Specification dialog (or the Geometric Shape Specification dialog) and change the Width, Depth, Height, and Floor to Top/Bottom values for the column, as well as the materials that it has applied to it.
- You may also find it helpful to resize the column in a Full Camera
 view.
view.
- Use the Select Objects
- You can adjust the position of the column once placed by using the Select Objects tool to select the column, and use it's center square Move
 edit handle to move it in to place.
If you have difficulty placing the column precisely where you want, hold down the Ctrl/Command key on your keyboard while moving it to allow for unrestricted movement.
- If other columns will be identical to your original column, use the Select Objects tool to select the column, then click on the Copy/Paste
 edit button.
- Click on the Sticky Mode
 secondary edit button, then click in different areas of the plan to paste the appropriate number of copies.
- Using the Select Objects tool, click on a single column, then use the Move edit handle to move it into place. Repeat this procedure to precisely move the columns to the desired location(s).
- Create a Camera
 view to see the results.
Related Articles