Creating a Deck
Pro | Architectural | Suite
QUESTION
How do I design a deck in Home Designer?

ANSWER
Home Designer offers a variety of tools that you can use to design a unique outdoor living area to suit your home and your lifestyle.
This article will cover the following:
- Creating a deck room
- Creating a stepped/tiered deck
- Drawing stairs down from your deck to the terrain
- Accessorizing the deck
- Adding designer railing panels to your deck railing
To create a deck room
- Select Build> Railing and Deck> Straight Deck Railing
 from the menu, then click and drag to draw a deck railing.
- Continue drawing deck railings, with each new railing starting from the end of the last, to form a defined deck room.
- Using the Select Objects
 tool, click on each deck railing, one at a time, and position them accurately using edit handles or dimensions.
For more information on moving walls and railings precisely using dimensions, please see the Related Articles section below.
- Select 3D> Create Perspective View> Perspective Full Overview
 to see the results so far.
In legacy products, navigate to 3D> Create Camera View> Perspective Full Overview instead.

Note: When an area is enclosed by deck railings or a combination of deck railings and walls, it will automatically be designated as a Deck room. A Deck room, by default, will not have a ceiling or roof and will have deck framing components instead of regular flooring.
Many decks have multiple floor heights or stepped areas, adding interest and drama to these outdoor rooms. You can create this in Home Designer by dividing your deck into different room areas and assigning them different floor heights.
To create a stepped/tiered deck
- Select File> Close View to return to floor plan view.
- Select Build> Railing and Deck> Straight Deck Railing from the menu, then click and drag a deck railing to divide the deck into at least two separate areas.
- Using the Select Objects tool, select one of the newly defined areas of the deck that you would like to raise or lower, then click the Open Object
 edit button.

- On the Structure panel of the Room Specification dialog that displays, specify a new Floor height value, then click OK.
In this example, a Floor height of -7" is specified.
- Select Build> Door> Doorway
 from the menu, then click along the railing drawn in step 2 to place an opening at that location.
- Using the Select Objects tool, click on the newly placed doorway to select it.

- Click the Center Object
 edit button, then click in either deck area, near the doorway, to center the doorway along the railing.
- With the doorway still selected, use the end edit handles to resize it as needed or Open it to specification and adjust the properties in the dialog that displays.
Instead of placing a doorway, you can specify the entire dividing railing as Invisible on the General panel of the Deck Railing Specification dialog if you don't want a physical railing to separate the stepped/tiered deck areas.
- Click the Center Object
- Select 3D> Create Perspective View> Perspective Full Overview to see the results.
In legacy products, navigate to 3D> Create Camera View> Perspective Full Overview instead.

Many decks feature stairs that lead down to the ground.
To draw stairs down from the deck to the terrain
- Select File> Close View to return to floor plan view.
- Select Build> Stairs> Straight Stairs
 from the menu, hold down the Alt/Option key on your keyboard, then click and drag to draw a staircase starting from the deck.
Holding down the Alt/Option key while drawing stairs creates the stairway with each additional tread going downward, where as typically when creating stairs, they move upward.

- Select 3D> Create Perspective View> Perspective Full Overview to see the results.
In legacy products, navigate to 3D> Create Camera View> Perspective Full Overview instead.

- Once the stairs are in place, you can edit the width, if needed.
When the structural elements of the deck are in place, you can select a railing style for the railings, place furniture, and arrange accent pieces and plants.
To accessorize the deck
- Select File> Close View to return to floor plan view, then click the Select Objects tool.
- A variety of furnishings and accessories for your deck space can be found in the Library Browser. Select View> Library Browser
 from the menu to open the Library Browser side window if it's not already open.
- Deck furniture can be found by navigating to Core Catalogs> Exteriors> Outdoor Living.
- Shrubs, trees, annuals and perennials, as well as potted plants, can be found by navigating to Core Catalogs> Plants.
- A selection of designer railing Balusters, Newels, and Posts can be found by navigating to Core Catalogs> Architectural> Millwork.
- Deck furniture can be found by navigating to Core Catalogs> Exteriors> Outdoor Living.
- Select an object that you would like to place in your plan, move your pointer into the floor plan view, then click to place the object at that location.
- Once placed in a plan, objects can be moved, resized, and their materials can be customized.

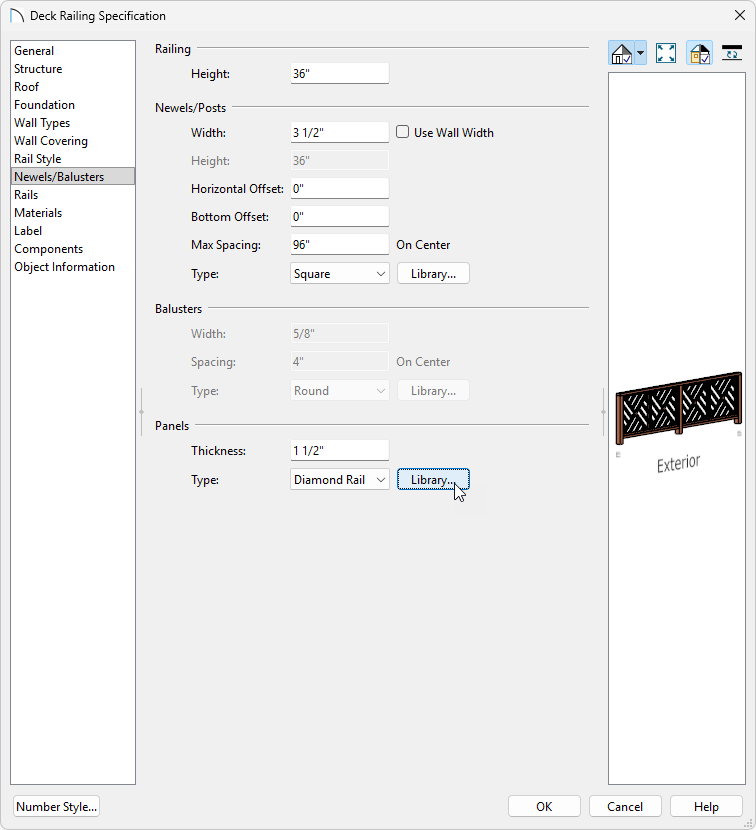
Railing panels are found in the Fences & Railings and Millwork library folders and are placed as individual objects within railings.
To add designer railing panels to railings
- Using the Select Objects tool, click on a railing to select it, then click the Open Object edit button.
- In the Deck Railing Specification dialog:
-
On the Rail Style panel, under Railing Type, click the radio button beside Panels.
- On the Newels/Balusters panel, set the Railing's Height.
- Also on the Newels/Balusters panel, under the Panels section, click on the Library button to display the Select Library Object dialog and navigate to an appropriate panel type for your railing.
-
Click OK to close each of dialogs and apply your changes.
-
On the Rail Style panel, under Railing Type, click the radio button beside Panels.
- Create a Full Camera
 view to see the results.