Creating an Outdoor Kitchen
Pro | Architectural | Suite
QUESTION
I want to design an outdoor kitchen using my Home Designer program. How can I do that?

ANSWER
Customizing an exterior room, such as an outdoor kitchen, is easy to accomplish using the tools and objects available in the Library Browser. Some thoughts to consider when designing an outdoor kitchen are proximity to the main house, counter space, and appliances.
To create a concrete slab for your exterior kitchen room
- Launch your Home Designer software program and either start a New Plan
 , or choose to Open
  the existing plan in which you would like to create your outdoor kitchen.
- Select Build> Wall> Room Divider
 and click and drag out each wall in a clockwise fashion until you have a completely enclosed space.
A straight Room Divider segment can be changed to a curved segment by selecting it and clicking on the Change Line/Arc edit button.
- After your enclosed room has been created, use the Select Objects
 tool to highlight what will become the outdoor kitchen, and click on the Open Object
  edit button.
- In the Room Specification dialog that displays:

-
On the General panel, use the Room Type drop-down menu to select a room type of Slab.
-
On the Materials panel, set the appropriate Floor Finish material by selecting this component and clicking on the Select Material button.
- Once these changes have been made, click OK.
-
On the General panel, use the Room Type drop-down menu to select a room type of Slab.
Next, let's place some outdoor objects, such as a grill.
To place outdoor appliances
- Select View> Library Browser
 , and either search for a particular item, or browse to it directly.
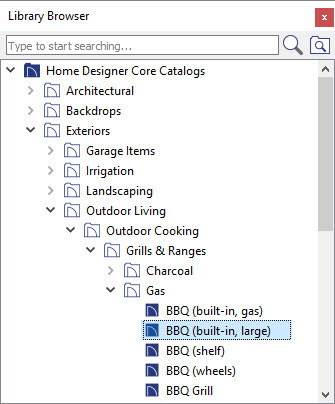
- After you have found an appropriate item to place in your plan, select it, and click in the plan to place it.
- If needed, select the newly placed item and resize or move it to the location you want it to be in your plan.
In addition to placing objects from your Library Browser, cabinetry can also be modified to model a variety of different objects, such as the wood burning oven below.

To create a small wood-burning oven as in the above image
- Select Build> Cabinet> Full Height
 from the menu and click in your view to place a full height cabinet.
- With the cabinet placed, use the Select Objects tool to click on the cabinet, then choose the Open Object edit button.
- In the Full Height Cabinet Specification dialog that displays:

- On the General panel, make any necessary adjustments to the Width, Height, and Cabinet Type.
For the purposes of this example, we used a Corner cabinet, set the Height to 84" and both the Left and Right Side Widths to 42".
- Next, we are going to go to the Front panel to remove the existing doors and create two openings, one for wood storage and one for our wood-burning oven.
Click on the upper door of the cabinet in the preview to select it and click on the Delete button to remove it. Select the remaining door and toe kick and Delete them as well. If you are unable to select the doors in the preview, click Select Cabinet Face Item button above the preview, then try again.
If you see shelves after deleting the cabinet doors, select them in the preview image and hit the Delete button.
We are now left with a single Blank Area on the cabinet when we select the preview, which we can adjust the Item Height of to be 18".
- Click Add New and use the Item Type drop-down to specify an Opening set at a Item Height of 12", then click OK.
- Next, click Add New and create a Blank Area below the wood burning oven with an Item Height of 20", then create a second Opening with an Item Height of 24".
Be sure to uncheck the Include Shelves checkbox each time an opening is added. In Home Designer Pro, select the Specify button next to the Shelves setting, select the Manual option under the Shelf Management section, specify the Number of Shelves to be 0, then click OK.
- Lastly create a Separation with an Item Height of 1".
- Now that we have finished customizing the front of our cabinet, we can go to the Materials panel to specify materials for the cabinet.
- On the General panel, make any necessary adjustments to the Width, Height, and Cabinet Type.
- Once you have completed making changes, click OK to apply them.
- You can use a smaller corner cabinet using this same procedure without any Front items to stack on top of this first cabinet, and a cylinder from the Shapes section of the Library Browser to complete this object.