Adding Wallpaper to a Room
Pro | Architectural | Suite
QUESTION
I would like to apply multiple materials to the walls in my plan, such as different paint colors, wallpaper, or wallpaper borders. What are my options?

ANSWER
There are a number of options for applying wallpaper. It can be quickly applied to all walls in a room, to individual walls, and to horizontal sections of either an individual wall or an entire room if you're using Home Designer Architectural or Home Designer Pro.
In this example, we will apply wallpaper in these different manners; however, you can also use the same steps to apply different paint colors, wainscoting, bead board, or any other material to the walls in your plan.
To add wallpaper to an entire room
- Using the Select Objects
 tool, select the room, then click on the Open Object
  edit button.
- On the Materials panel of the Room Specification dialog that opens, click on the Walls component, then click the Select Material button.

- In the Select Material dialog, browse and select a material that suits your needs, then click OK on both dialogs to apply the selected material.
Another way to quickly apply a wallpaper or other material to the walls of a room is to use the Material Painter while in a 3D camera view. Please see the Related Articles section to learn more.
To apply a horizontal section of wallpaper*
*Applies to Home Designer Architectural and Home Designer Pro Only
- Using the Select Objects tool, click inside of a room to select it, then click on the Open Object edit button.
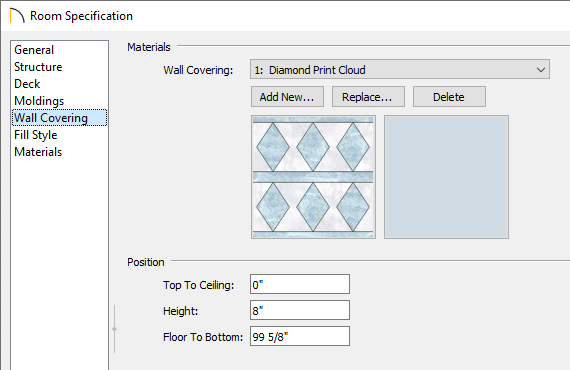
- On the Wall Covering panel of the Room Specification dialog, click the Add New button.
- In the Select Material dialog, browse and select a material to use as wallpaper, then click OK to close the dialog and return to the Room Specification dialog.
- Specify the Top To Ceiling, Height, and Floor To Bottom values of the horizontal section that you would like to apply wallpaper to.
- Begin with the Height value, then press the Tab key on your keyboard to update the dialog without closing it.
- Next, specify either the Top to Ceiling or Floor to Bottom value - depending on which is the easiest for you to figure - and press the Tab key. The remaining value will update automatically.
- Begin with the Height value, then press the Tab key on your keyboard to update the dialog without closing it.
- You can select additional wall coverings by clicking the Add New button and repeating steps 3 and 4, above.
- Place different wall coverings at different heights so that they will all be visible and not cover each other.
- To delete a wall covering, select it from the Wall Covering drop-down list, then click the Delete button.
- To replace a wall covering, select it from the drop-down list and click the Replace button.
- When you are satisfied with your wall covering selections, click OK to close the dialog and apply your changes.
- Place different wall coverings at different heights so that they will all be visible and not cover each other.
- Select 3D> Create Camera View> Full Camera
 , and click and drag in the room to view the new wall covering(s).
In Home Designer Pro, navigate to 3D> Create Perspective View> Full Camera instead.
To apply wallpaper to an individual wall
- Use the Select Objects tool to select the individual wall you want to change, then select the Open Object edit button.
- On the Materials panel of the Wall Specification dialog that displays, click on the Interior Wall Surface component, then click the Select Material button.
- In the Select Material dialog, browse and select a material that suits your needs, then click OK on both dialogs to apply the selected material.
To apply horizontal sections of wall paper to a single wall*
*Applies to Home Designer Architectural and Home Designer Pro Only
The method for applying horizontal sections of wallpaper to an individual wall is very similar to that for applying them to a room.
Instead of using the Wall Coverings panel of the Room Specification dialog, Open the wall in question and use the Wall Coverings panel within the Wall Specification dialog.