Creating a Coffered Ceiling Using the Soffit Tool
Pro | Architectural | Suite
QUESTION
I would like a quick way to create a coffered ceiling with molding on the beams and cross-beams. Is there a way to do this in Home Designer?

ANSWER
Coffered ceilings feature a pattern of exposed beams or soffits with recessed panels between them. They are sometimes highly detailed and are used in many architectural styles.
The Soffit tool is ideal for creating a wide variety of coffered ceiling patterns and styles.
- Creating ceiling beams using soffits
- Replicating soffits across the room
- Replicating soffits using the Transform/Replicate edit tool (Applies to Home Designer 2026 and newer, as well as Home Designer Pro)
To create ceiling beams using soffits
- Select Build> Cabinet> Soffit
 from the menu, then click once in the room to place it. This soffit will act as the beam that will span the length or width of the room.

- Using the Select Objects
 tool, select the newly created soffit, and use the edit handles to adjust its width, depth, and position in the room.
In this example, a 10' x 20' room is present and a soffit is placed spanning a distance of 109".

- With the soffit still selected, click the Open Object
 edit button, and in the Soffit Specification dialog that displays:
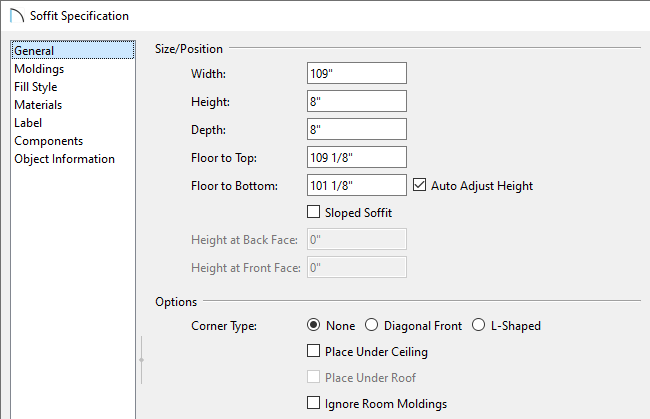
- Specify the Width, Height,Depth and Floor to Top/Bottom values of your soffit to be precisely what you'd like them to be on the General panel.
In this example, the Width spans the distance between the top and bottom walls which is 109", the Height and Depth are set to 8", and the Floor to Top is 109 1/8".
- Add moldings to the soffit by accessing the Moldings panel and clicking the Add New button. Once a molding profile is added, you can adjust it's properties, such as the Width, Height, and Offsets.
You can apply as many molding profiles to the sides of the soffit as you would like, adjusting the profile sizes and offset heights as needed so they do not conflict with one another. As you add profiles, they appear on the preview diagram on the right side of the dialog.
In this example, the CV05 - Cove Molding is specified. The Width and Height are both set to 3", and the Vertical Offset is set to 5/8".
Note: If crown molding is already specified for the room the coffered ceiling is being created within, adding molding to individual soffits may not be necessary, unless a different profile with different properties is wanted.
- Adjust the materials of the soffit and any applied moldings on the Materials panel.
- Click OK to close the dialog and apply your changes.
- Specify the Width, Height,Depth and Floor to Top/Bottom values of your soffit to be precisely what you'd like them to be on the General panel.
- Create a Camera
 view inside the room to ensure that the soffit that is representing the beam is defined exactly as you'd like. If it's not, make any other desired changes before proceeding to the next section.

To replicate the soffits across the room
In Home Designer 2026 and newer, as well as in Home Designer Pro, there is an easier way to replicate objects. Please see the next section on replicating soffits using the Transform/Replicate edit tool if you're using one of these versions.
-
Select the soffit, click the Copy/Paste
 edit tool, then click on the Sticky Mode
  secondary edit tool, which allows you to paste as many copies as you'd like without re-selecting the tool each time.

- When you're ready to de-select the Copy/Paste tool, click the Select Objects tool or press the Spacebar on the keyboard.
- Position the pasted soffits as needed using the Move
 edit handle that displays on each soffit when selected. You can also select each soffit and use Temporary Dimensions
  to position them equally apart.
Note: Holding down the Ctrl/Command key on the keyboard while you re-position an object allows you to temporarily override move restrictions caused by the presence of other objects.

- In some instances, we may want to create beams running perpendicular to those that were just placed. To do this, select one of the soffits that was pasted, create a copy of it and paste it into the plan using the Copy/Paste edit tool, then use the Rotate
 edit handle to rotate it 90 degrees.
- Use the Move edit handle to move it to your desired location. You may also need to extend the soffit if the room it's placed in is not a complete square.

- Repeat Step 1 mentioned above to create several copies of the soffit and move them into position as needed.

- Lastly, create a Camera view to see the results.

To replicate soffits using the Transform/Replicate edit tool*
*Applies to Home Designer 2026 and newer, as well as Home Designer Pro.
- Click on the soffit to select it and use the Move edit handle to position the soffit to be in your desired location. You can also use Temporary Dimensions to position it a specific distance from a wall or another object.
Note: Holding down the Ctrl/Command key on the keyboard while you re-position an object allows you to temporarily override move restrictions caused by the presence of other objects.
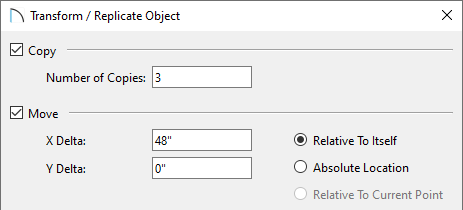
- With the soffit still selected, click the Transform/Replicate Object
 edit tool.
- In the Transform/Replicate Object dialog that displays:
- Check the box beside Copy and specify the number of copies you would like to create.
- Check the box beside Move and specify the intervals at which you would like these copies to be replicated.
- Type a value in the X Delta field if you would like the copies to replicate to the left or right (use a negative number to replicate to the left).
- Type a value in the Y Delta field if you would like the copies to replicate up or down (use a negative number to replicate downward).
- Type a value in the X Delta field if you would like the copies to replicate to the left or right (use a negative number to replicate to the left).
- Click OK to close the dialog and create the specified copies.
- Check the box beside Copy and specify the number of copies you would like to create.
- In some instances, we may want to create beams running perpendicular to those that were just placed. To do this, select one of the soffits that was pasted, create a copy of it and paste it into the plan using the Copy/Paste edit tool, then use the Rotate edit handle to rotate it 90 degrees.
- Use the Move edit handle to move it to your desired location. You may also need to extend the soffit if the room it's placed in is not a complete square.
- Repeat Steps 2-3 mentioned above to create several copies of the soffit.
- Lastly, create a Camera view to see the results.