Creating Waterfall Countertops
Pro | Architectural | Suite
QUESTION
I would like to create a waterfall style countertop. What is the easiest way to do this in Home Designer?

ANSWER
Waterfall countertops can be created automatically in Home Designer Architectural 2021, Home Designer Professional 2021, and newer versions by utilizing custom countertops alongside the waterfall edge feature. Additionally, all Home Designer products can utilize the partition tool to create a waterfall countertop manually.
- Creating waterfall countertops automatically
-
Using partitions to create waterfall countertops manually
To create waterfall countertops automatically
Applies to Home Designer Architectural 2021, Home Designer Pro 2021, and newer versions.
- Navigate to Build> Cabinet> Base Cabinet
 then click to place an island or bay of cabinets.
- Navigate to Build> Cabinet> Custom Countertop
 , then click and drag to create a custom countertop that encompasses all of the cabinets created in Step 1.
Additionally, you can group select cabinets and use the Generate Custom Countertop edit button to create a custom countertop.
For more information on working with custom countertops, please see the Related Articles section below or access your program's Help documentation.
- After a custom countertop has been created or generated, adjust its shape to your liking. This is a great time to extend one or more edges of the countertop so it overhangs the cabinets.
- With the shape set, use the Select Objects
 tool to select an edge of the countertop you would like to apply a waterfall edge to.
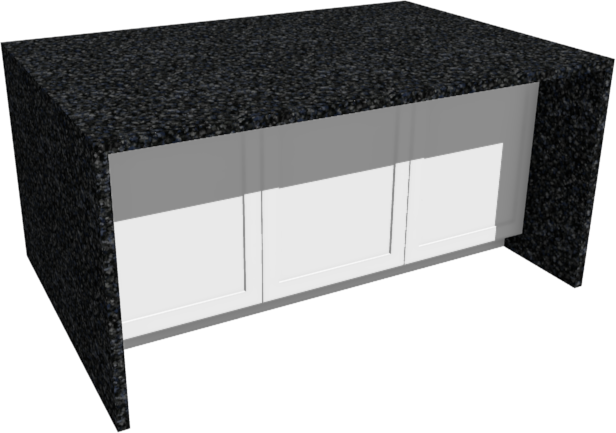
In this example, the left side of the countertop is selected, which is notated by the red selected handle in the image below.
If you have trouble selecting the countertop due to the cabinets being in the same location, try pressing the Tab key on your keyboard or clicking on the Select Next Object edit button.

- Click the Open Object
 edit button and on the General panel of the Custom Countertop Specification that displays:
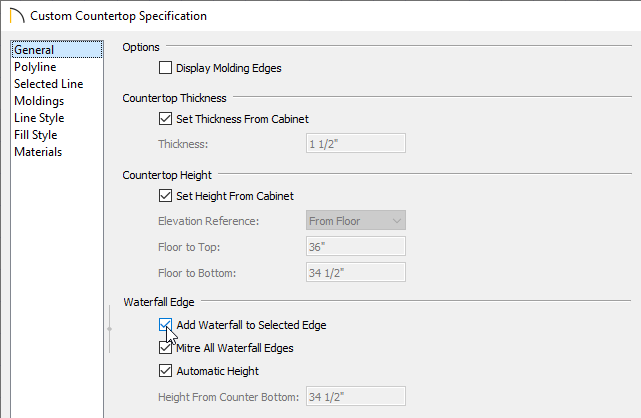
- Check the Add Waterfall to Selected Edge box.
- Choose to Mitre All Waterfall Edges to create butt joints with seams that may be visible in some views where the waterfall meets the horizontal countertop and any adjacent waterfall edges. When checked, these joints are mitered so the only visible seams are located at the corners.
- When Automatic Height is checked, the waterfall builds down to the floor height of the room the countertop is in, or the default floor height for the current floor if it is not in a room. Uncheck this to specify the waterfall's vertical height.
- Specify the Height From Counter Bottom, measured from the bottom of the horizontal countertop to the bottom of the waterfall.
Note: Alternatively, you can select a countertop edge and use the Add Waterfall to Selected Edge edit button to quickly add a waterfall edge without accessing the dialog mentioned above.
- Check the Add Waterfall to Selected Edge box.
- On the Materials panel, click on the Custom Countertop (polyline) component, click on the Select Material button, and browse the library for an appropriate material.
- Click OK and OK again to confirm the changes and close the dialog boxes.
- Perform this same procedure on any other edges you would like to apply a waterfall effect to.
- Take a Camera
 view to see the results.
Using partitions to create waterfall countertops manually
- Navigate to Build> Cabinet> Base Cabinet then click to place a kitchen island or bay of cabinets.
For more information on creating a kitchen island or a breakfast bar, please see the Related Articles section below.
- If an overhang is desired, click on your desired cabinets, select the Open Object edit tool, and specify Overhang values on the General panel of the Base Cabinet Specification dialog.
Note: To specify Overhang values on a per-side basis, uncheck the Uniform checkbox.
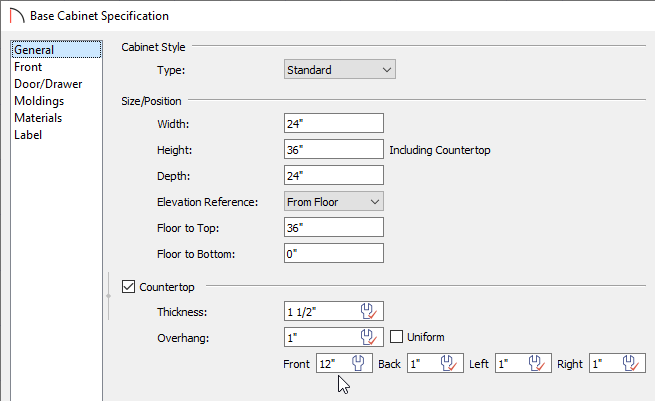
- On the Materials panel, click on the Countertop component, then click on the Select Material button to browse the library for an appropriate material.
- Click OK and OK again to confirm the changes and close the dialog boxes.
- Now, select Build> Cabinet> Partition
 and click once in a blank spot on the plan to place a partition.

-
With the Select Objects tool, select the partition, then click the Open Object edit button.
-
On the General panel of the Partition Specification dialog that displays:
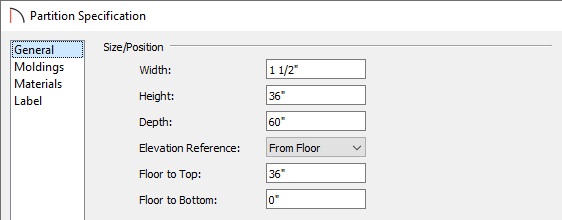
- Set the Width to match the thickness of the countertop.
In this example, a value of 1 1/2" is used.
- Set the Height to the height of the cabinets, plus the thickness of the countertop.
In this example, a value of 36" is used.
- Set the Depth so that it spans the full side of the kitchen island.
In this example, 60" is used.
- Verify that Floor to Bottom is set to 0.
- Set the Width to match the thickness of the countertop.
- On the Materials panel, select the same material that was chosen in Step 3 above, then click OK.
- With the Select Objects tool, select the partition and place it next to the island.
You can now replicate this partition by repeating Steps 5-8 above, or you can use the Copy/Paste edit tool to create a copy and place it into the correct position on the other side of the kitchen island.