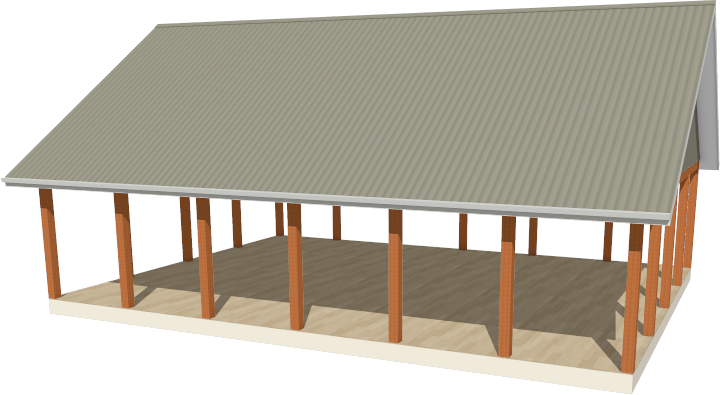
Creating an Open Pole Barn Carport or Pavilion
Pro | Architectural | Suite
Question
I would like to design an open pole barn structure to use as a carport or pavilion. How can I do this in Home Designer?

ANSWER
A simple open pole structure can be created using Railings. In Home Designer Pro, you can also use the dedicated Framing tools such as the Post, Beam, and Truss tools to accomplish this task.
To create the building perimeter
-
Open
 the Home Designer plan in which you would like to create a pole structure or select File> New Plan
  from the menu to open a new, blank plan.
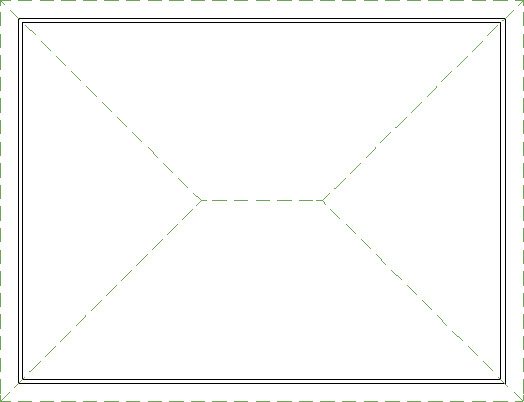
- Select Build> Railing and Deck> Straight Railing
 from the menu, then click and drag in the drawing area to draw an enclosed rectangular structure.
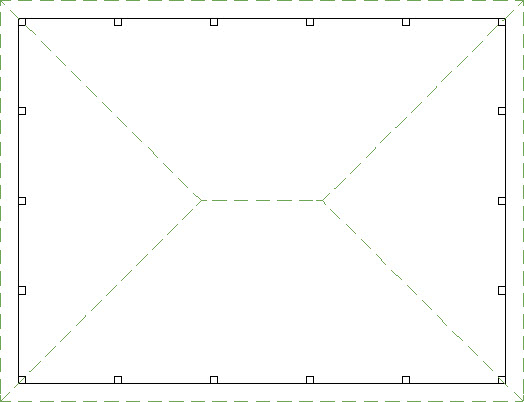
In this example, a 30' x 40' structure is drawn.
- Using the Select Objects
 tool, click on one of the railings to select it, then click the Open Object
  edit tool.
- On the General panel of the Railing Specification dialog that displays:
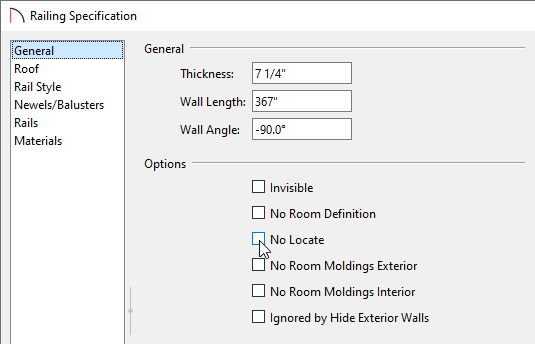
- Specify the Thickness to equal the size of posts that you want.
In this example, 7 1/4" is used.
- Uncheck No Locate so that the railing will be located if you choose to use the Auto Exterior Dimensions
 tool.
tool.
- Specify the Thickness to equal the size of posts that you want.
- On the Rail Style panel:

- Specify the Railing Type to be Open.
- Specify the Newels/Posts to be Post to Beam.
- Uncheck both Include Top Rail and Include Bottom Rail.
- Specify the Railing Type to be Open.
- On the Newels/Balusters panel:
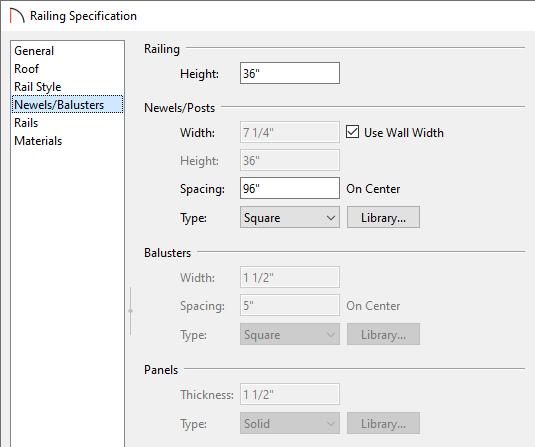
- Ensure that the Width of the Newels/Posts is the same as the railings width. This will be grayed out if the Use Wall Width box is checked.
- If you'd like, you can specify the (O.C.) Spacing for the Newels/Posts, as well as the Type.
In this example, we will use Square newels and 96" Spacing, which are the defaults.
- Ensure that the Width of the Newels/Posts is the same as the railings width. This will be grayed out if the Use Wall Width box is checked.
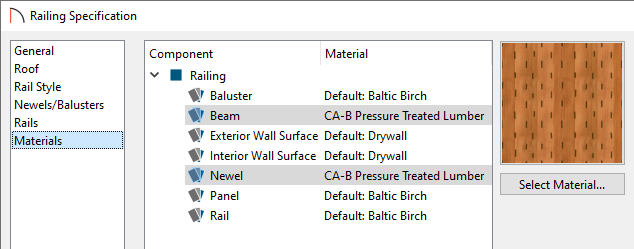
- On the Materials panel, change the materials of the Beam and Newel components, then click OK to close the dialog.
In this example, the CA-B Pressure Treated Lumber material is used.
- Repeat this procedure for each of your structure's perimeter railing walls.
In situations where no posts are desired on one or more sides of your structure, you can either specify the Spacing (O.C.) to be as large as the total length of the railing wall, or you can set the railing wall to be No Post under the Newels/Posts section within the Railing Specification dialog. Please see Step 5 and Step 6 above for reference.
- Take a Camera
 view to see the results so far.
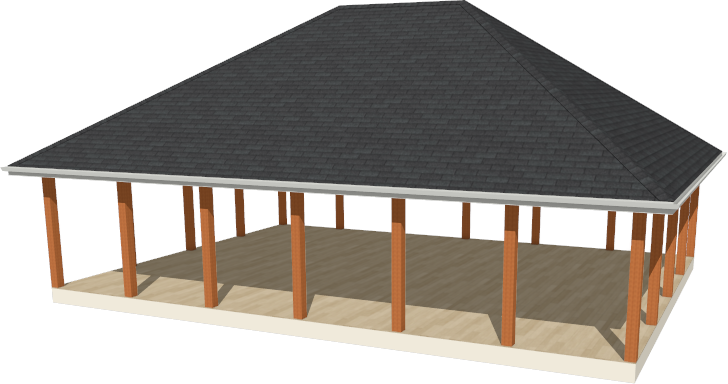
By default, the program will generate a roof plane over each exterior wall, defining a hip roof.
To create a gable roof
- Click the Select Objects button, then click on a railing wall that you would like to have a gable above.
- With the railing wall selected, click on the Open Object edit tool.
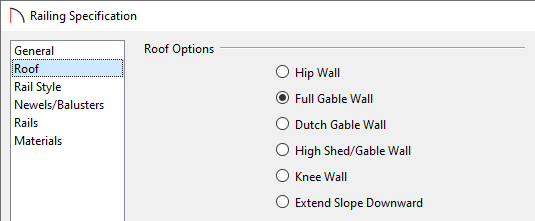
- On the Roof panel of the Railing/Wall Specification dialog that opens, select the Full Gable Wall option, then click OK.
- Select Build> Roof> Build Roof
 from the menu.
- On the Roof panel of the Build Roof dialog that opens, specify the desired Pitch and Overhang values.
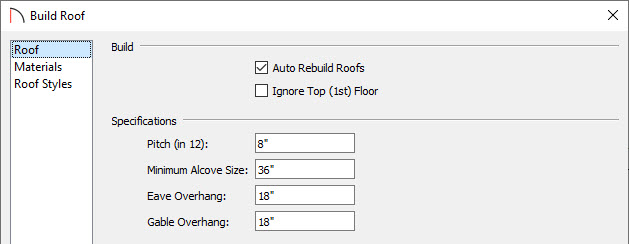
- On the Materials panel, you can select materials for the Roof Surface, Fascia, and more.
- When you are finished making your desired changes, click OK to rebuild the roof and take a Camera view to see the results.
Note: If you would like to have an open gable rather than one enclosed by a physical wall, navigate up to Floor A (Attic) in a plan view, select each of the gable attic walls here, and click the Make Wall(s) Invisible edit tool.
A Question box may appear that mentions that you're editing an automatically generated wall. Click Yes to confirm the change.
The default floor structure for a new room is a framed platform with wood flooring. This can be easily changed to a slab, or to no floor platform whatsoever.
To add a concrete monolithic slab floor
- Using the Select Objects tool, click in an empty space in the pole structure's room to select it, then click the Open Object edit tool.
- On the General panel of the Room Specification dialog that opens:
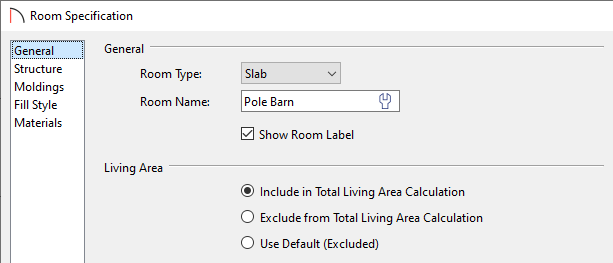
- Use the Room Type drop-down and select the "Slab" option if you're wanting a concrete slab.
- For a structure with no floor, select "Open Below."
- If you'd like, you can type a custom Room Name in the text field.
- Under the Living Area heading, select the radio button beside Include in Total Living Area Calculation.
- Click OK to close the dialog and apply your changes.
- Use the Room Type drop-down and select the "Slab" option if you're wanting a concrete slab.
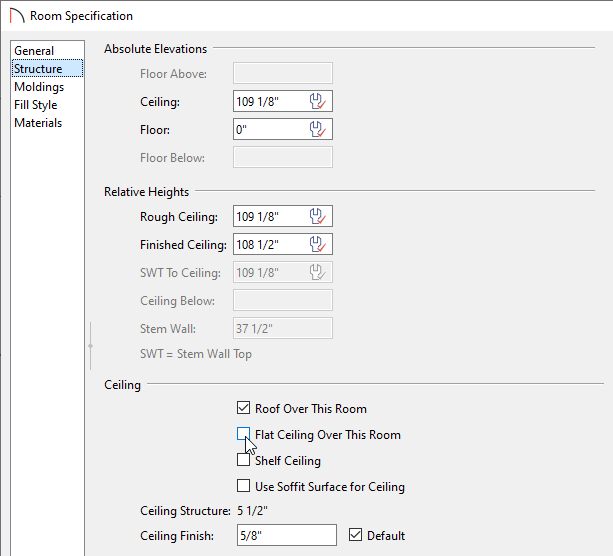
Most pole barns use the underside of the roof as a ceiling rather than a flat ceiling. This can be easily specified.
To create a sloped ceiling
- Select the room and click on the Open Object edit button once more.
- On the Structure panel of the Room Specification dialog, uncheck Flat Ceiling Over This Room, then click OK.
Use corbels from the Library Browser ![]() to add angled braces at the top of the posts, or add other Millwork objects to add details to your structure.
to add angled braces at the top of the posts, or add other Millwork objects to add details to your structure.