Creating a Materials List for an Event
Pro | Architectural | Suite
QUESTION
How can I use a Materials List in Home Designer to help me plan an event?

ANSWER
Planning an event, such as a wedding, anniversary, or graduation party, can require a lot of time and effort. You can use your Home Designer software to make the process easier, since it allows you to not only select the event's color style themes and decide how to use the venue's available space, but also generate a Materials List with items to purchase and estimate the associated costs.
It is not necessary to wait until the plan is complete to generate a Materials List. However, a Materials List generates based on the current state of the plan, so it is typically one of the last steps in the process.
Materials Lists can be created, edited, and printed directly from the program, as well as exported for use in other programs.
To place, edit, and arrange objects
- If the Library Browser isn't already open, navigate to View> Library Browser
 , then either browse in the Folders panel, or use the search field in the Filters panel to locate objects.
In this example, the Kitchen Accessories No.1 Cookware and Kitchen Accessories No.2 Dishes and Serving Bonus Catalogs are used.
For information on downloading additional library catalogs, please see the Related Articles section below.
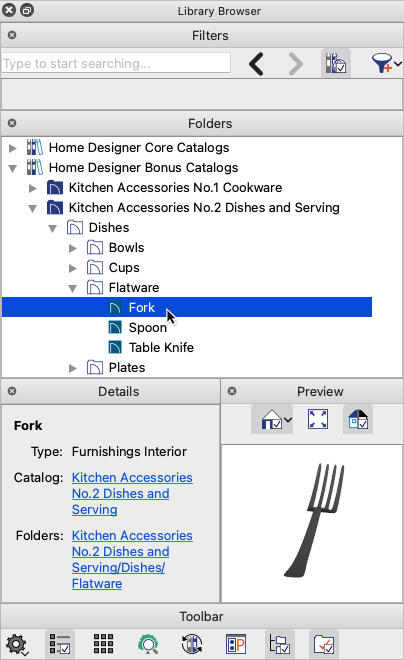
- Select the object you want to place, then click in plan view to place it.
Flatware and similar objects are automatically placed on top of a table surface, but you can make adjustments as needed using the Floor to Bottom height in their specification dialog after placing them.
- Use the Select Objects
 tool to select the object, then click the Open Object
  edit tool to display its specification dialog. On the Materials panel, you can specify the object's material(s) before making copies of it.
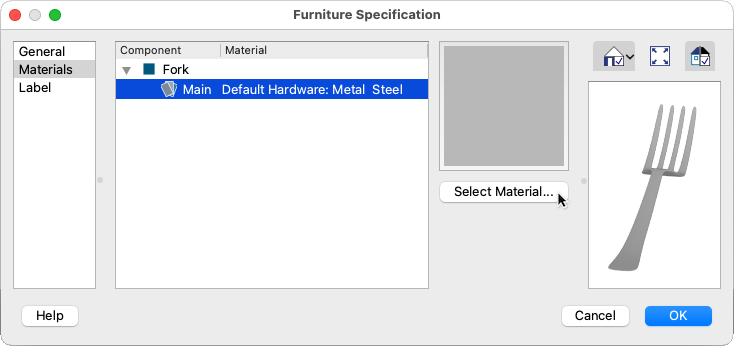
Note: You can create a custom material if the material you want isn't available in the Library Browser. For more information about customizing materials, please see the Related Articles section below.
- When you're finished, click OK to apply your changes and close the dialog. You can use the same procedure to place, edit, and arrange as many objects as needed.
To select and copy/paste groups of objects
- Group select objects that you would like to copy and paste to a new location using one of the following methods:
- When the Select Objects tool is active, click-and-drag a selection marquee around multiple objects.
-
Select an object, then hold down the Shift key while clicking on additional objects to add them to the selection set one-by-one.
To remove an object from the selection set, hold down the Ctrl/Command key and click on it.
- When the Select Objects
- Click the Copy/Paste
 edit button to enable copy/paste mode.
- Click the Sticky Mode
 edit button to remain in copy/paste mode, then click to place as many copies of the selected objects as needed.
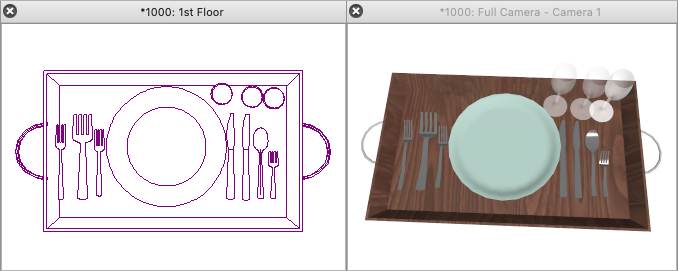
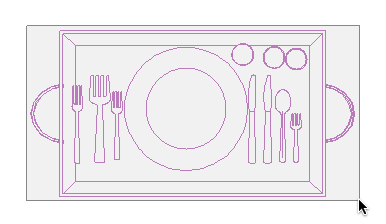
In the example below, we placed four copies of the selected dinnerware arrangement onto a table.

- When you're finished placing copies, click the Select Objects tool to exit copy/paste mode.
You can use this same procedure to copy/paste larger groups of objects as well, such as the entire table arrangement in the example above.
To replace objects with different objects from the Library*
*Applies to Home Designer Architectural and Home Designer Pro only.
If you decide to change something after placing copies of your table arrangements, such as the type of chairs, there's an easy way to replace all of them at once using the Replace from Library  edit tool.
-
With the Select Objects tool active, click on one of the chairs in a floor plan view to select it.
- Click the Replace From Library edit button to open the Replace From Library dialog.

- Select Replace identical objects on floor.
-
Click the Library button, then in the Select Library Object dialog that opens, find the chair you want to use, select it, and click OK.

-
Click OK once more to confirm the changes.
- Select Replace identical objects on floor.
- Click the Replace From Library
When you've completed your event plan, you're ready to generate a Materials List.
To generate, edit, and print or export a Materials List
A Materials List can be generated for the whole plan, an area of the plan, or a single room.
-
Select Tools> Materials List> Calculate Materials for All Floors
 to generate a Materials List for the whole plan.

Materials Lists are often long enough that only a portion will display on your screen at one time. In that case, use the scroll wheel on your mouse or the scrollbar on the right to scroll through the complete list.
Changes made to the plan after a Materials List is generated are not included in that list.
-
When a Materials List is open, control the information it displays by selecting Tools> Materials List> Materials List Specification
 from the menu, toggling the display of categories and columns, then clicking OK.
In Home Designer Suite 2022 and Home Designer Architectural 2022, navigate to Tools> Materials List Specification instead.
In Home Designer 2021 and prior versions, navigate to Tools> Materials List Display Options instead.
If the display of a category is suppressed, the information is still part of the Materials List. If the Materials List is exported, the information from the suppressed categories is included.
For more information on controlling the information that's displayed in a Materials List, please see the Related Articles section below.
-
To change the description or price of an item, double-click in the cell you would like to change, type in it, then press the Enter/Return key to apply the change.

The Total Cost column, including Subtotal amounts and the overall Total, will update based on information entered in the Price and Count columns (Count × Price = Total Cost).
In Home Designer Pro, you can edit an object's information that's used in a Materials List by selecting the Components panel of the object's specification dialog. To learn more, please see the "Estimating Material Take Offs in Home Designer Pro" resource in the Related Articles section below.
-
Select File> Print
 to print the Materials List, or select File> Export Materials List
  to export the Materials List as a text file, which can be further edited in other word processing and spreadsheet programs.
In Home Designer Pro, you can also save a Materials List within a plan file and export a Materials List as .CSV, .XML, and .HTML file types.