Placing a Gate in a Terrain Wall
Reference Number:
KB-00873
Last Modified:
November 30, 2022
This article also applies to the following legacy products:
Pro | Architectural | Suite
Pro | Architectural | Suite
QUESTION
I want to design a stone perimeter wall that follows the uneven terrain in my plan, and then place a wrought iron gate in it. How do I create this in Home Designer?

ANSWER
Creating a stone wall that follows your terrain is easy using the Terrain Wall and Fencing tools.
To place a Terrain Wall
- Select Terrain> Terrain Wall and Curb> Straight Terrain Wall
 then click and drag in your plan to create your straight wall.
Note: If you do not have a terrain perimeter in your plan already, the Terrain Wall tool will be grayed out. Go to Floor 1 and select Terrain> Create Terrain Perimeter from the menu to add a terrain perimeter to work with.
- Use the Select Objects
 tool to select the terrain wall, then click the Open Object
  edit button to display the Terrain Path Specification dialog.
- In the Terrain Path Specification dialog:
- On the General panel, set the thickness by changing the Width the thickness you need.
- Set the Height to your desired height.
- Go to the Materials panel and select the Terrain Path Default: Concrete 1. With that highlighted, click Select Material... button to display the Select Material dialog.
In this example, we used the Cambria stone material from the Eldorado Stone manufacturer catalog.
- On the General panel, set the thickness by changing the Width the thickness you need.
- Click OK again to apply the material and close the Terrain Path Specification dialog.
While in many ways a Terrain Wall acts like a fence and follows the contours of the terrain features, regions, and elevation lines that you have placed, it does not act like a fence in that you cannot place a gate directly into the terrain wall.
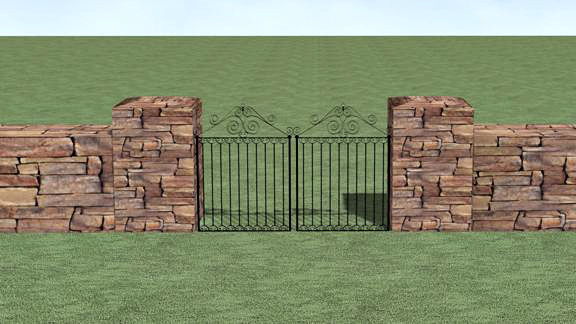
To add a gate, we will next add a section of fencing between two section of terrain wall and then place a gate in the fencing.
To place a gate in a Terrain Wall
- First, create two sections of Terrain Wall and with a blank area, or space, between them to accommodate the fending and gate.
In this example, a gap of 9 ft (108 in) is used.
- Select Build> Fencing> Straight Fencing
 and draw a short fence segment in between the two terrain walls.
- Select View> Library Browser
 and either navigate or use the Search feature to find a gate to place in the fence segment.
- Click on a gate to select it, then move your mouse into the drawing area click once on the fence to place a gate at that location.
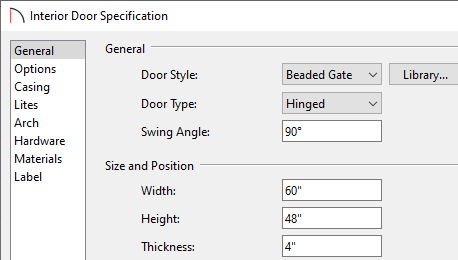
- Using the Select Objects tool, select the gate and click the Open Object edit button.
- On the General panel of the Interior Door Specification dialog, set the Width, Height, and Thickness to your desired dimensions and click OK to accept the changes.
- Using the Select Objects tool, click the fence segment and click on the Open Object edit button to open the Fencing Specification dialog.
- On the General panel, change the Thickness of the fence.
The thickness of the fencing needs to be greater than that of the terrain walls if you want to create the appearance of larger square columns on either side of the gate.
- On the Newels/Balusters panel, increase the Newels/Post Height to a height that suites your needs.
- On the Materials panel, set the fencing's materials to be the same materials used for the terrain walls.
- Click OK to apply your changes and close the Fencing Specification dialog.
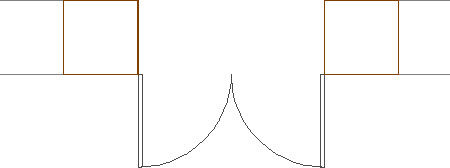
The image below shows what the 2D plan view of the terrain walls, fence, and gate should look like.
- To place a top on the fencing columns, you can use the finials or caps found in the Library under Home Designer Core Catalogs> Architectural> Millwork.
Related Articles