Creating Floor Platforms that Hang Inside Walls
Pro
QUESTION
I would like my floor joists to be hung on the inside of my foundation stem walls or on the inside of my other framed walls. How can I accomplish this?

ANSWER
Available in both the Build Foundation and Wall Specification dialogs, the Hang Floor Platform settings can be utilized to hang a floor platform on the inside of your walls instead of bearing on top.
To hang a 1st floor platform inside foundation walls using the Build Foundation dialog
- With your 1st floor footprint established, navigate to Build> Floor> Build Foundation
 from the menu.
- On the Foundation panel of the Build Foundation dialog that displays:
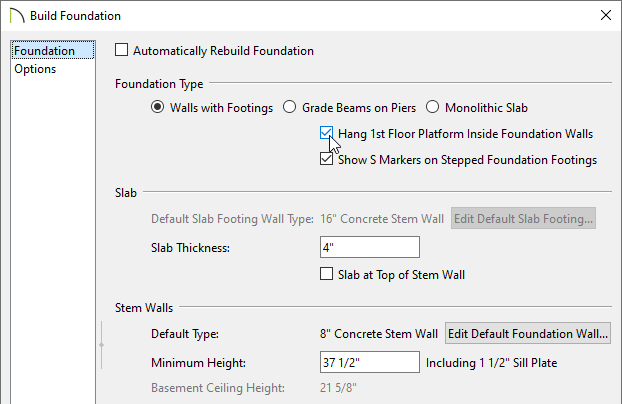
- Under Foundation Type, select the Walls with Footings option. This option must be specified to generate a hung floor platform inside foundation walls.
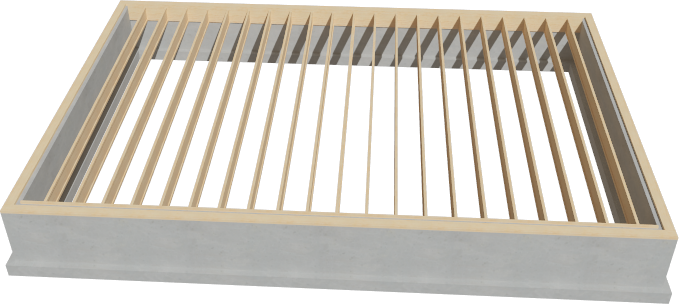
- Check the Hang 1st Floor Platform Inside Foundation Walls box. Checking this box will produce stem walls that will build up to the top of the floor platform of Floor 1.
- Specify any other desired settings, such as the Slab Thickness and Minimum Height for your Stem Walls, then click OK.
- Under Foundation Type, select the Walls with Footings option. This option must be specified to generate a hung floor platform inside foundation walls.
- On Floor 0, which is the newly created foundation level, select any foundation walls that will serve as bearing walls and which you would like ledger boards for, then click the Open Object
 edit tool.
Multiple walls can be selected by holding down the Shift key, then clicking on each wall that will be part of the group selection. To learn more about group selecting objects, please see the Related Articles section below.
- On the Structure panel of the Wall Specification dialog that displays, check the Include Ledger box to generate a ledger board in which the floor platform will be attached to, then click OK.
The ledger board properties are defined by the Rim Joist settings located in the Framing Defaults.
Note: An additional setting is available called "Subflooring to Wall Interior," which when checked, produces subflooring that builds to the inside surface of the wall. When unchecked, the subflooring builds over the top of the wall to the outside of its Main Layer. The wall's top height may be lowered to accommodate a sill plate.

- Generate floor framing, then create a Framing Overview
 or Cross Section/Elevation
  view to see the results.
To hang a floor platform on the inside of walls using the Wall Specification dialog
- Using the Select Objects
 tool, select the wall(s) you would like to hang the floor platform above on, then click the Open Object edit tool.
Multiple walls can be selected by holding down the Shift key, then clicking on each wall that will be part of the group selection. To learn more about group selecting objects, please see the Related Articles section below.
- On the Structure panel of the Wall Specification dialog:
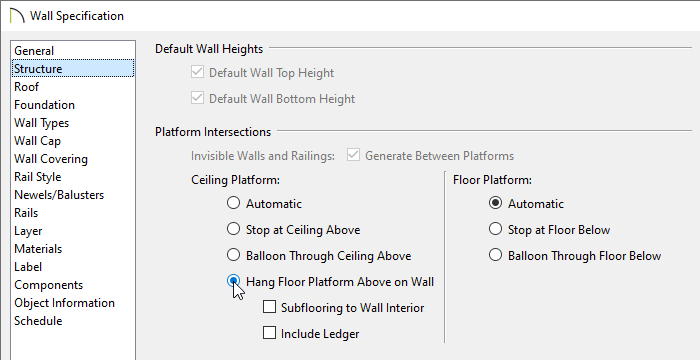
- Select the Hang Floor Platform Above on Wall radio button under the Platform Intersections section.
- To produce subflooring that builds to the inside surface of the wall, check the Subflooring to Wall Interior box. When unchecked, the subflooring builds over the top of the wall to the outside of its Main Layer. The wall's top height may be lowered to accommodate a sill plate.
- To hang the platform from a ledger board attached to the wall, check the Include Ledger box. When unchecked, no ledger is created when platform framing is generated.
- Click OK to confirm the changes.
- Select the Hang Floor Platform Above on Wall radio button under the Platform Intersections section.
- Generate floor framing, then create a Framing Overview or Cross Section/Elevation view to see the results.