Changing the Backdrop in a Camera View
Reference Number:
KB-00325
Last Modified:
October 2, 2024
This article also applies to the following legacy products:
Pro | Architectural | Suite
Pro | Architectural | Suite
QUESTION
How can I change the background image that displays in my 3D camera views?

ANSWER
Home Designer offers several options for the background image used in 3D views: an image included in the program's library, a solid color, and an image file from an outside source.
To modify the backdrop
- Select Edit> Default Settings
 to open the Default Settings dialog.
- Expand the Camera Tools category, select the camera tool you'd like to modify the backdrop of, then click Edit.
- In the next dialog that appears, click on the 3D Backdrop or Backdrop panel.
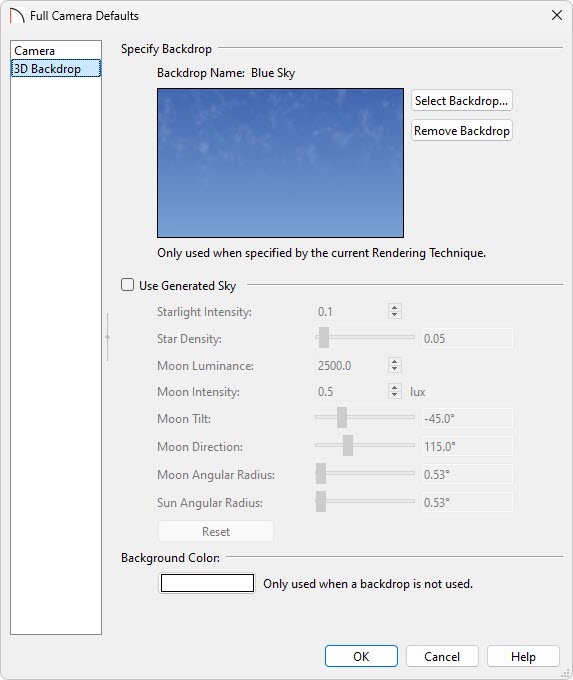
- Click on the Select Backdrop button to choose a different backdrop from the library or a custom backdrop that has been imported.
- Select the Remove Backdrop button to remove the backdrop image and replace it with the Background Color that is specified.
- Check the Use Generated Sky box to use a sky backdrop that simulates different times of day based on the position of the Generic Sun. This feature is not supported in elevation views.
To learn more about the various sky options, click the Help button at the bottom of the dialog to open your program's documentation.
- Click OK and Done to confirm the changes and close the dialogs.
Note: In Home Designer Pro, a spherical backdrop can also be specified, which allows you to wrap an image onto a sphere that surrounds the model.
- Click on the Select Backdrop button to choose a different backdrop from the library or a custom backdrop that has been imported.
Now, when a new 3D or elevation view is created, you will see the changes that have been made to the backdrop settings.
If you have a photograph of the construction area your building will be built on, you may want to import the image and use it as a background or backdrop when creating 3D views to simulate a more realistic rendering of your model and its surrounding view.
To import a backdrop
- Select File> Import> Import Backdrop

- The Import Backdrop File dialog, which appears next, allows you to browse for an image on your computer. Once you have located the image you want to use, select it, then click the Open button.
Note: In 2025 and newer you are able to import .HDR files, which can be used to provide high quality, realistic scene lighting.*
A collection of HDR backdrops are also available for download in the Backdrops No.2 HDRI bonus catalog.
For more information on HDR backdrops, please access your program's documentation.
*The .HDR file type is only supported in Home Designer Architectural and Home Designer Pro.
- In the Backdrop Specification dialog that displays, specify a Name, whether it's a Spherical Panoramic Backdrop* or not, then click OK.
In Home Designer Pro, spherical backdrop options can be enabled for imported backdrop images during this step, but they should only be used if the image was specially created to serve as a spherical panoramic backdrop.
*Applies to Home Designer Pro.
- The backdrop can now be found in the User Catalog section of the Library Browser
 and can now be selected and applied using the Select Backdrop button mentioned in the section above.
Related Articles