Understanding Wall Heights in a Doll House View
Pro | Architectural | Suite
QUESTION
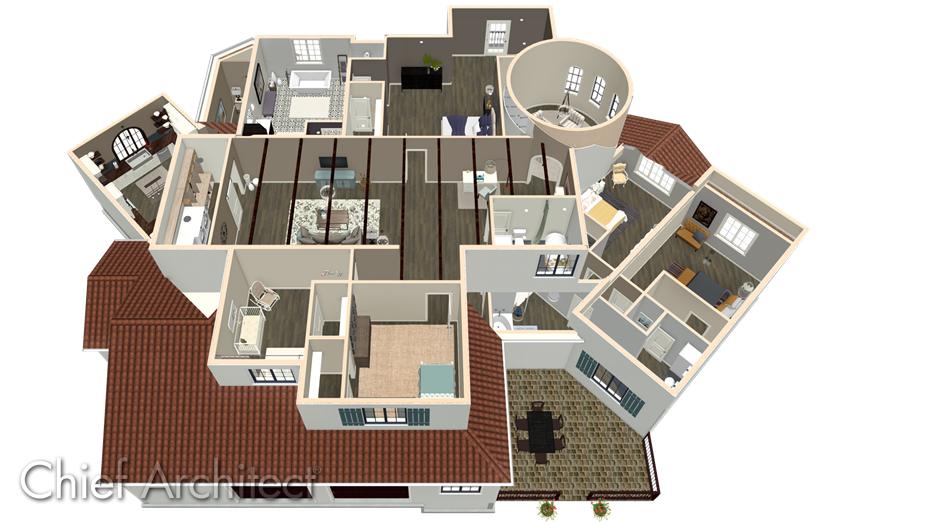
When I create a Doll House View of one of the floors in my plan, the walls aren't all at the same height. Why is this?

ANSWER
In this article, we will discuss why you may be seeing differing wall heights in Doll House Views. If you are looking for information on changing wall heights, please see the Related Articles section below.
The Doll House View allows you to create a view of the current floor with the ceiling removed, and all floors beneath it are visible. This type of view is a effective at illustrating traffic flow and the relationships between spaces. Doll House Views will display the top of walls as cut off by the ceiling or roof planes. However, it will not show Attic Walls from the floor above.
To create a doll house view
-
Select 3D> Create Camera View> Doll House View
 .
.
In Home Designer Pro, select 3D> Create Perspective View> Doll House View instead..
-
To see a different floor, select Tools> Floor/Reference Display> Up One Floor
 or Down One Floor
  .
.
In Home Designer Pro, you can specify whether or not lower floors are visible in Doll House Views by accessing the Doll House View Defaults or the Doll House View Specification dialog.
While in a Doll House View, you may notice that not all of the walls are at the same height. The reason for this is that the rooms themselves likely have differing ceiling heights from the rooms surrounding them. This may have occurred from modifying the ceiling heights in the Room Specification.
In Home Designer Pro, you may have also selected individual wall heights in camera views to raise them up or down separately from the rest of the room.
To check ceiling heights
- In either your 2D floor plan view, or in the Doll House View, use the Select Objects
 tool to select a given room, then click on the Open Object
  edit button.
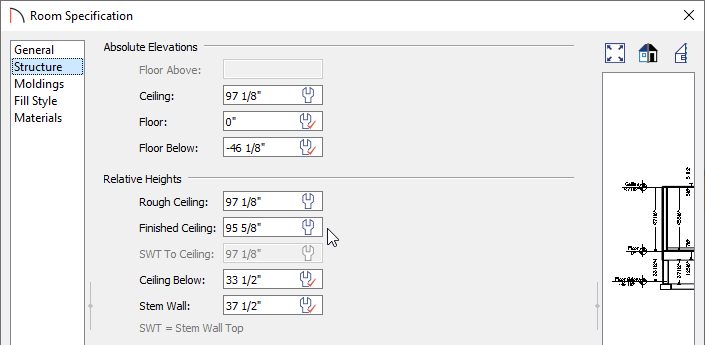
- On the Structure panel of the Room Specification dialog that displays, observe the Finished Ceiling value.

-
In this example, we can see that the value is set to 95 5/8". Notice also that the wrench icon in this field does not contain a red checkmark. This indicates that this field is not following the default value set in the Floor Defaults and could vary from the surrounding rooms.
Note: To learn more about Floor Defaults, see the appropriate resource in the Related Articles section below.
-
If the wrench icon contains a red checkmark, then the room is using the default Finished Ceiling as set in the Floor Defaults, which may indicate that one of the other surrounding roomslikely has a higher or lower Finished Ceiling value.
-
If a room is not following the default and you would like it to, simply select the wrench icon. If you knowingly have varying ceiling heights between connected rooms and the values are already set to your liking, no changes need to be made as the walls are displaying as intended when using the Doll House View tool.
-
If the Finished Ceiling value is greyed out and inactive and you see a message in the dialog that states the ceiling values cannot be changed, it means that multiple rooms with differing floor heights are present on the floor directly above this room.
-
Make any desired changes to the Finished Ceiling and click OK, or click Cancel if no changes need to be made.
-
In this example, we can see that the value is set to 95 5/8". Notice also that the wrench icon in this field does not contain a red checkmark. This indicates that this field is not following the default value set in the Floor Defaults and could vary from the surrounding rooms.
- If needed, repeat steps 1 and 2 to check the Finished Ceiling values of the other rooms in your plan.
If it appears that multiple rooms have different ceiling heights and you want to reset them all back to the same, default value, consider using the Reset to Defaults tool.
To reset floor and ceiling heights back to the default values
- Select Edit> Reset to Defaults from the menu.
If you have already completed your roof, and do not want the new ceiling heights to be used to rebuild it, first exit out of Reset to Defaults, go to the Build Roof dialog, and uncheck Auto Rebuild Roofs before continuing.
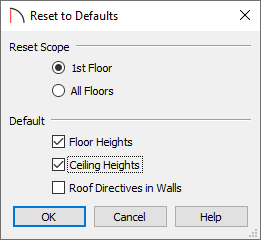
- In the Reset to Defaults dialog:

-
Set the Reset Scope to the currently active floor or All Floors.
-
Check the Floor Heights and Ceiling Heights boxes.
Note: In Home Designer Pro, check the Wall Top Heights and Wall Bottom Heights boxes to reset the heights of manually modified walls.
- Click OK to apply this change and reset all of these values back to their defaults.
-
Set the Reset Scope to the currently active floor or All Floors.