Setting Floor Defaults and Building, Inserting, or Deleting a Floor
Pro | Architectural | Suite
QUESTION
I need to be able to setup my floor defaults so that when I build or insert a new floor, the floor and ceiling heights are correct.

ANSWER
In Home Designer Pro and Home Designer Architectural, a plan can have up to five floors, plus a foundation. In the other Home Designer products, three floors plus a foundation are possible.
Setting up the Floor Defaults correctly for each floor is an important step that helps you save time and avoid errors. Floor Default allow you to set the floor height, ceiling height, molding, and overall structure of any given floor. By setting the floor defaults for a floor before you edit specific rooms, you can quickly establish the common parameters of that floor.
To build a new floor
- Create a second floor on this plan by selecting Build> Floor> Build New Floor
 to display the New Floor dialog.

- For the purposes of this example, when prompted, choose to Derive the Second Floor From the First Floor and click OK.
- The Floor 2 Defaults dialog opens, allowing you to specify the default values for your newly created floor. When you click OK, the first floor perimeter walls are copied to the new second floor.
Although ideally you will set your defaults as early as possible in the drawing process, you can make changes to the defaults later on. Now that you have created your second floor, take another look at the Floor Defaults.
To view or modify floor defaults
- From the menu, navigate to Edit> Default Settings
 .
.
- In the Default Settings dialog, click the arrow next to Floors and Rooms to expand the category, then expand the Floor Levels category as well. Select a floor level of your choice, then click the Edit button.
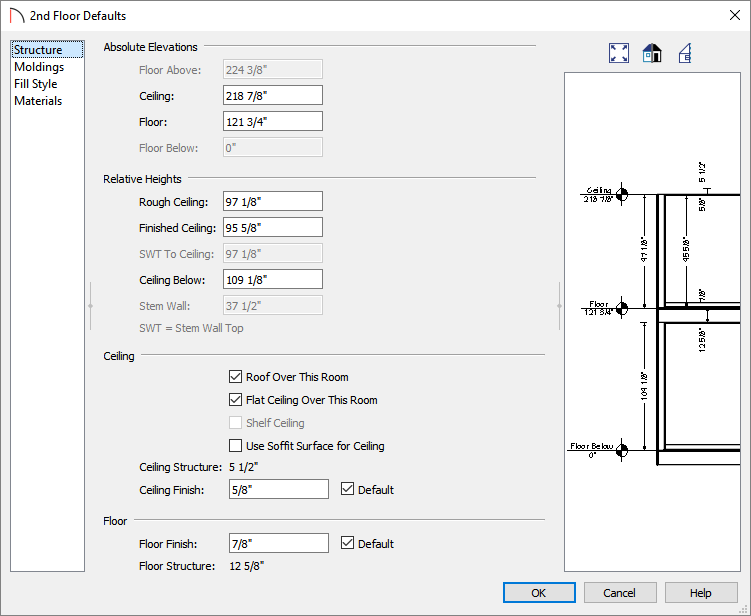
- The appropriate default dialog will appear for the current active floor. Here, the Floor 2 Defaults dialog box is opened.
- In Home Designer version 2019 and prior program versions, only the Floor Defaults dialog for the current floor was listed in the Default Settings dialog. To open the defaults dialog for a given floor, you must go to that floor in plan view.
Set the default Ceiling Height for each floor to the highest ceiling on that floor level. You can then specify lower or dropped ceilings as needed on a room by room basis in the Room Specification dialog once rooms are defined.
- The appropriate default dialog will appear for the current active floor. Here, the Floor 2 Defaults dialog box is opened.
- In this case, you don't want to make any changes, so choose Cancel to exit this dialog without saving your changes.
Working with and resetting defaults
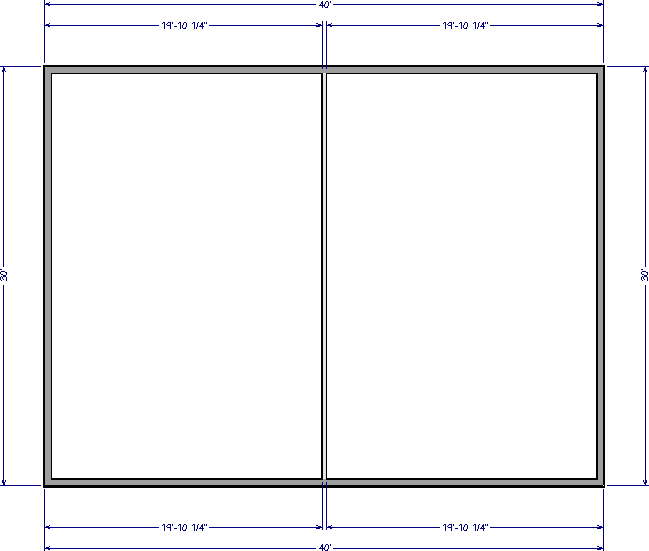
- Select Build> Wall> Straight Interior Wall
 and create a new interior wall for our second floor as illustrated below.
- Using the Select Objects
 tool, click in an empty space in a room to select it. When a room is selected, the space within it will be highlighted.
- With the room selected, click the Open Object
 edit button.
- On the Structure panel of the Room Specification dialog, you can specify the Ceiling Height, Floor Height, and other values just as you can in the Floor Defaults dialog.
- Notice the wrench icon on the right side of each of the height fields. This indicates whether or not each option is set to use the default values for this floor. To see what this means:
- Change the Finished Ceiling value and either click in another field or press the Tab key to update the dialog.
- Notice that the wrench icon loses its red checkmark when a non-default value is specified.
- To dynamically link this option to the default value for the current floor again, click once on the wrench icon to restore the red checkmark.
- In Home Designer 2019 and prior program versions, dynamic defaults were instead controlled using a Default checkbox to the right of each setting.
- Change the Finished Ceiling value and either click in another field or press the Tab key to update the dialog.
To add a foundation
- To add a foundation, select Build> Floor> Build Foundation
 .
.
- In the Build Foundation dialog, you can choose the type of foundation to build and set foundation wall thickness and height. When Automatically Rebuild Foundation is checked, the foundation will rebuild automatically if a change is made to the first floor.
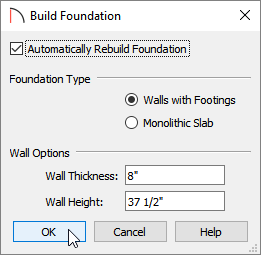
Note: If the Wall Height is at least 6 feet (1800 mm), a slab floor is generated above the footings and inside the foundation walls. The Wall Height includes the thickness of this slab.
To delete or remove floors
- Select Build> Floor> Delete Current Floor to remove the current floor from the plan. If there is a floor above, it becomes the current floor. If there is no floor above, the floor beneath becomes the current floor.
To insert a floor
*For Home Designer Pro Only
- Select Build> Floor> Insert New Floor to display the Insert Floor dialog.
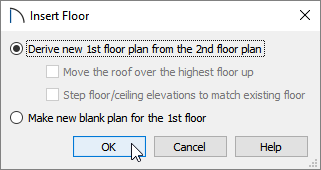
- Select one of the two available options:
-
Derive new floor plan from the floor plan - Select this option to insert a new floor below the current floor, based on the exterior walls of the current floor.
-
Make new blank plan for the floor - Select this option to insert a blank floor below the current floor.
-
Derive new floor plan from the floor plan - Select this option to insert a new floor below the current floor, based on the exterior walls of the current floor.
- Click OK and that floor's default dialog will display. Set any floor defaults necessary and click OK.
The existing floor and any floors above it are moved up, and a new floor is created below.