Creating a Custom Enclosure for a Drop-in Bathtub
Pro | Architectural | Suite
QUESTION
I'd like to use a specific undermount or drop-in bathtub in my plan, but it doesn't appear to have an enclosure. How can I create a custom enclosure for this object?

ANSWER
Many objects are ready to use as stand-alone objects, however, some objects like drop-in bathtubs are meant to be enclosed. A custom enclosure, or surround, can be created in Home Designer using the Base Cabinet tool.
In this article, we will be using a bathtub object from the Kohler® Manufacturer catalog. For more information on accessing additional catalogs, please see the Related Articles section below.
To create a bathtub enclosure
- Access the Library Browser
 , locate a drop-in bathtub that you would like to use in your plan, select it, and place it in your plan.
In this example, the K-1946 Archer 5' Bath symbol from the Kohler® Manufacturer catalog is used.
- Using the Select Objects
 tool, select the bathtub, and click the Open Object
  edit button.
- On the General panel of the Fixture Specification dialog that displays:
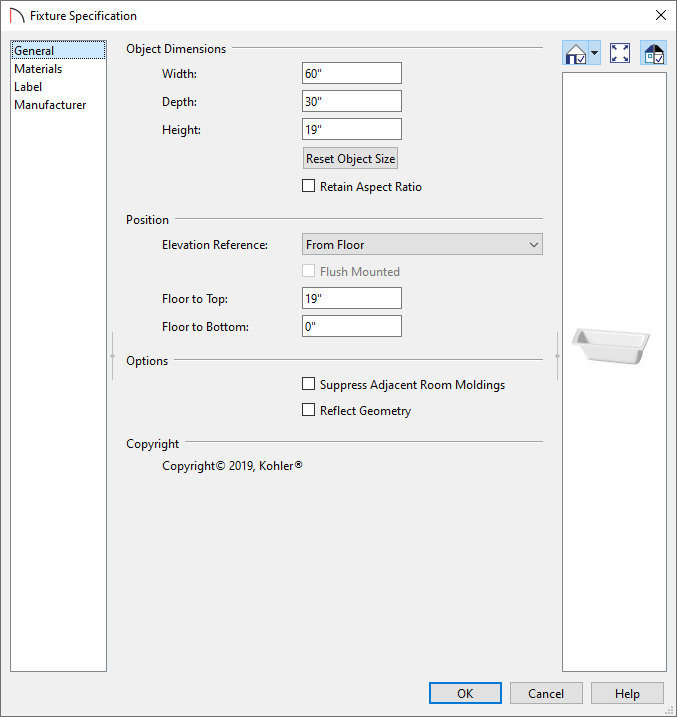
- Make a note of the symbol's Width, Depth, and Height. This is also a good time to change these values if you wish.
- Make any other desired changes, such as the material of the tub by accessing the Materials panel.
- Click OK to confirm the changes and close the dialog.
- Make a note of the symbol's Width, Depth, and Height. This is also a good time to change these values if you wish.
- Next, navigate to Build> Cabinet> Base Cabinet
 from the menu, then click to place a single base cabinet in the plan.
- Using the Select Objects tool, click on the cabinet to select it and select the Open Object edit button.
- On the General panel of the Base Cabinet Specification dialog:
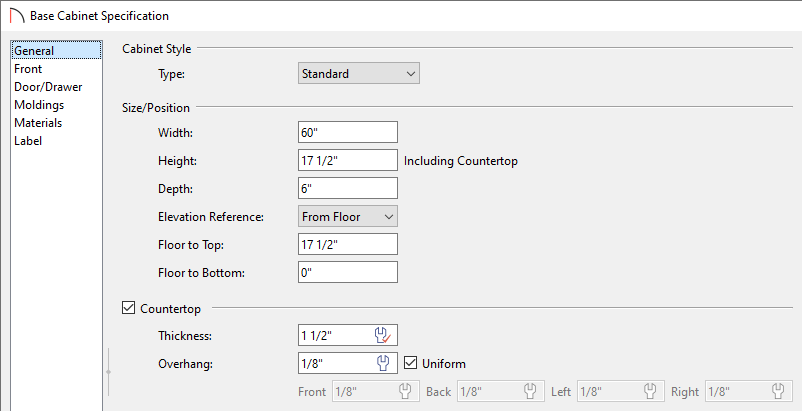
- Specify the cabinet's Width, Height, Depth, and Floor to Top/Bottom values.
The width and height should be close to the width and height of the tub symbol, while the depth will serve as the depth of the surround. In this example, the Width is set to 60", the Height is set to 17 1/2", the Depth is set to 6", and the Floor to Bottom is set to 0".
- Specify the Countertop Thickness, along with the Overhang.
In this example, the Thickness is set to 1 1/2" and the Overhang is set to 1/8".
Home Designer Pro also has the ability to change the Corner Treatment and Corner Width of the countertop. For example, corners can be Clipped or Rounded, and the Width value can be changed.
- If the bathtub and surround will be positioned against a wall, you may want to define the Backsplash Height, Thickness, and other options as well.
- Specify the cabinet's Width, Height, Depth, and Floor to Top/Bottom values.
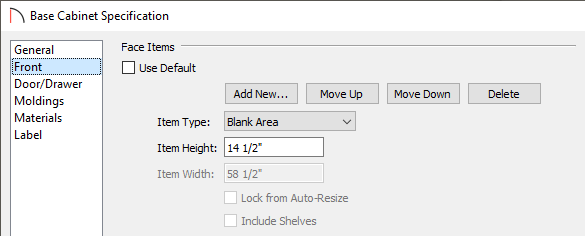
- On the Front panel:
- Click on the toe kick at the bottom of the preview diagram on the right side of the dialog box, then click the Delete button.
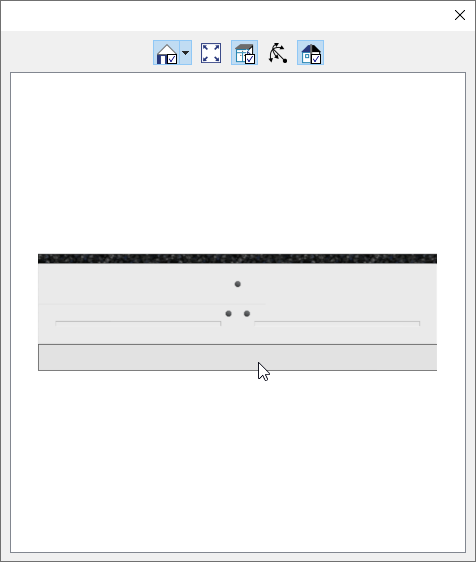
- Click on the drawer in the preview and click the Delete button a second time.
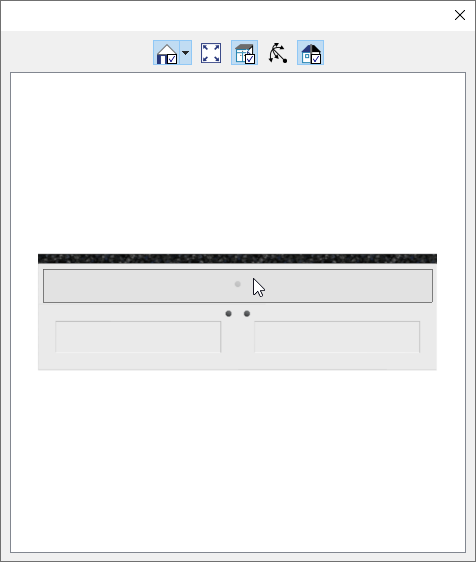
- Click on the doors in the preview, change the Item Type to either a Door - Panel or a Blank Area, depending on your preference, then verify the Item Height is to your liking.
In this example, the Item Type is set to Blank Area and an Item Height of 14 1/2" is specified.
- On the Materials panel, select the Countertop component, click the Select Material button, and browse the library for an appropriate material to serve as the top surface of the enclosure. Perform this same procedure for any other cabinet components you'd like to change.
- Click OK to close the dialog and apply your changes.
- Click on the toe kick at the bottom of the preview diagram on the right side of the dialog box, then click the Delete button.
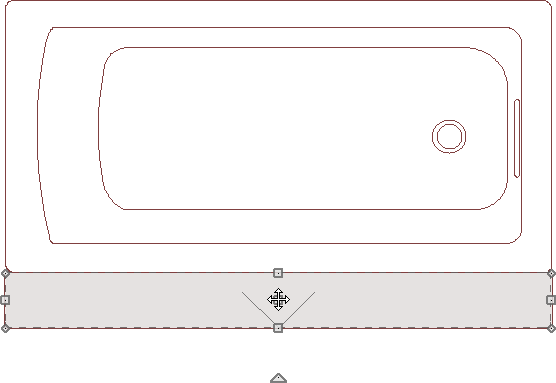
- With the cabinet selected, use its Move
 edit handle to position it alongside the bathtub symbol.
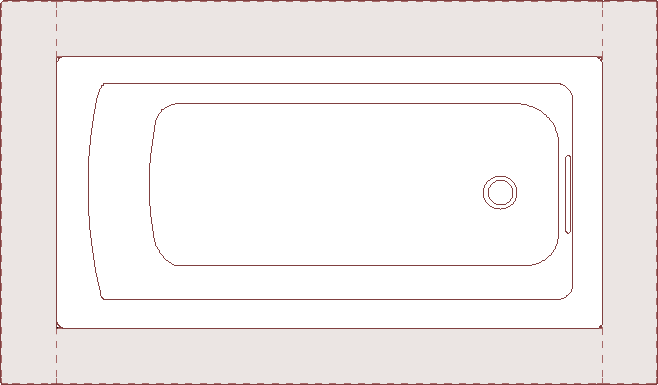
- With the cabinet still selected, make three more copies of it that you can use to form the other sides of the tub enclosure:
- Click the Copy/Paste
 edit button;
- Click the Sticky Mode
 secondary edit button;
- Click three times in an empty space near the tub to place copies of the cabinet.
- When you are finished, click the Select Objects button.
- Click the Copy/Paste
- The new copies of the base cabinet can now be selected individually, resized, rotated, and moved into position beside the bathtub symbol.
- Add any desired hardware such as a faucet, then take a Camera
 view to see the results.

To block the tub and enclosure together*
*Applies to Home Designer Architectural and Home Designer Pro Only.
- In a floor plan view, click the Select Objects tool.
- Hold down the Shift key on your keyboard, then click and drag to draw a rectangular selection marquee around the bathtub, hardware, and base cabinets to select them all as a group.
- With all of the objects selected, click the Make Architectural Block
 edit button.
- You can also click the Add to Library
 edit button to add this newly formed architectural block to the library for future use in other plan files.