Creating Built-in Wall Bookshelves
Pro | Architectural | Suite
QUESTION
I would like to have a built in wall bookcase with shelves and doors on the bottom. How do I build this into my wall?

ANSWER
You can create a built in wall book shelf by creating a recess in the wall and then placing full height cabinets within the recess. The cabinets can then be customized to meet the desired shelving arrangement.
To create a recess in the wall
- If you are working with a new plan, you will need to draw your room wall first. From the menu, select Build> Wall> Straight Exterior Wall
 and click and drag in floor plan view in a clockwise manner to add your exterior walls to the plan.
- Now you will need to draw the interior walls to create the recess. From the menu, select Build> Wall> Straight Interior Wall
 and click and drag in floor plan view to create a recess for the book case as below. The depth of this recess should be approximately 3 inches larger than your desired bookshelf depth.

Now that you have created the recess you are ready to place some full height cabinets within them for the shelves.
To place cabinets in the recess
- From the menu select Build> Cabinet> Full Height
 and position your mouse in the wall recess. Move the mouse towards the back wall of the recess to correctly orient the cabinet, then click to place.

- Using the Select Objects
 tool, select the cabinet and use the Open Object
  edit tool to open the Full Height Cabinet Specification dialog for the cabinet.
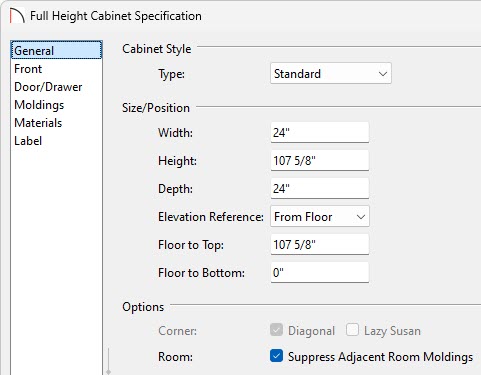
- Change the Height of the cabinet to 107 5/8", which is the default Finished Ceiling Height when a room is created. Press the Tab key on your keyboard after you have changed the height to update the cabinet without closing the dialog.
- Select the Front panel, click on the top door in the picture on the right, then change the Item Type from Door - Auto Right to Opening. You should now see open shelving sections at the top. Repeat this step for the bottom door.
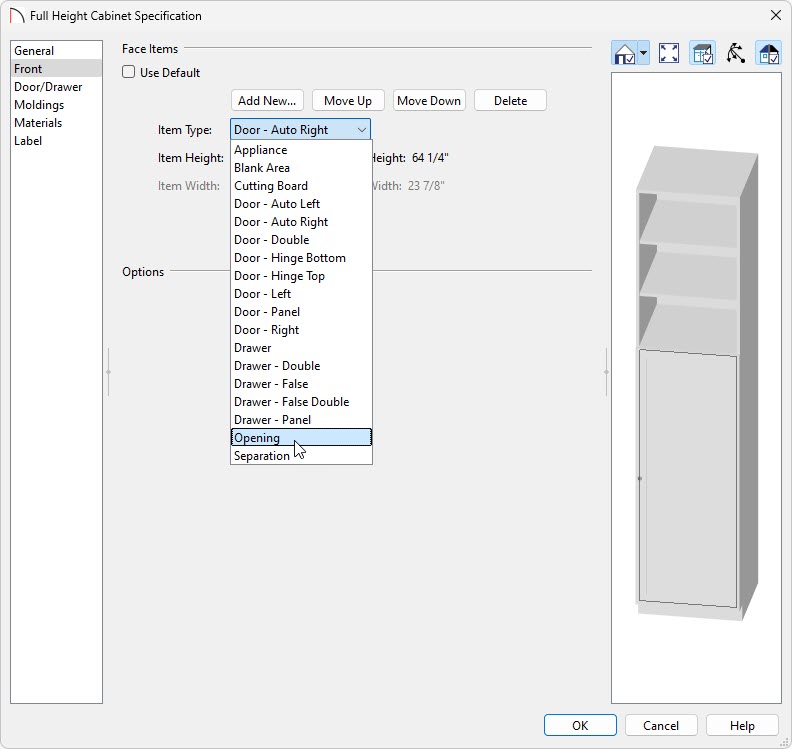
Note: In Home Designer Pro, shelf properties can be adjusted further by selecting the Opening component and clicking on the Specify button next to the Shelves field.
Also, starting in Home Designer Pro 2023, the minimum shelf spacing can be set within the General Cabinet Defaults, preventing the need to adjust the shelf spacing for each individual cabinet.
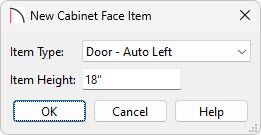
- Click the Add New button, then select Door - Auto Left and set the Item Height to 18".
You now have a correctly configured cabinet placed in the recess and simply need to duplicate this cabinet to fill the recess. If you wish to customize the materials used in the cabinet it is recommended to make these changes before copying your cabinet.
To fill the recess with the configured cabinet
- Select the cabinet that has already been placed, then from the menu select Edit> Copy
 and then Edit> Paste> Paste
  and click next to the cabinet to place another one. Select and drag it in till it snaps next to the existing cabinet and the back wall.

- Repeat this until the recess has been filled with cabinets.
- You may need to adjust the position of the interior side wall of the recess to perfectly fit the cabinets, or alternatively you can resize the cabinets to match the recess as required.
- You will want to change the bottom door on every second cabinet to Door - Auto Right. Using the Select Objects tool, select the cabinet and use the Open Object edit tool to open the Full Height Cabinet Specification dialog for the cabinet.
-
Select the door from the bottom of the picture on the right and change the Item Type from Door - Auto Left to Door - Auto Right. Repeat for any additional cabinets that need to be changed.
- To see the results, select 3D> Create Camera View> Full Camera
 from the menu and click and drag a camera arrow directed at the recess.
In Home Designer Pro, select 3D> Create Perspective View> Full Camera from the menu and click and drag a camera arrow directed at the recess.