Designing a Custom Closet
Pro | Architectural | Suite
QUESTION
I would like to design the storage in my walk-in closet. How can I do this?

ANSWER
Home Designer's Cabinet Tools allow you to create custom storage configurations to help organize any space.
The first step is to draw the available closet space and determine how much room is available.
Next, decide what kind, as well as how many storage components will be used. This is based not only on the available space but on the needs of the person or people using the space.
To plan your space
- Select Build> Wall> Straight Interior Wall
 from the menu, then click and drag to draw the walls defining your closet space.
Don't worry about placing the walls in their exact locations as you draw - you can easily position them accurately in a moment.
- Click the Select Objects
 button, then click on a wall to select it. Temporary dimensions will display, indicating the selected wall's distance from nearby walls that are parallel to it.
If you do not see temporary dimensions when you select the wall, select View> Temporary Dimensions from the menu.
- Move your cursor over a temporary dimension and click on it. In the Move Object Using Dimension in-line text box that displays:
- Specify the desired distance that you would like the selected wall to be from the opposite wall.
- When you press Enter, the selected wall will be moved and the temporary dimension will reflect the distance that you specified.
- Specify the desired distance that you would like the selected wall to be from the opposite wall.
- Select Build> Door
 from the menu, select the type of door that accesses your closet space from the submenu, then click to place a door of that type in a wall.
- You can change the door's hinge side and/or swing side by either dragging the triangular edit handle or by clicking the Change Opening/Hinge Side
 or Change Swing Side
  edit buttons.
- Showing the correct door swing is important, particularly in relatively small spaces such as closets, because it affects the available space for the placement of objects like storage components.

- You can change the door's hinge side and/or swing side by either dragging the triangular edit handle or by clicking the Change Opening/Hinge Side
To create a bank of drawers
Full Height Cabinets can be used to create a bank of drawers. Combine drawers with shelves and cabinet doors to create a custom configuration that suits your needs.
- Select Build> Cabinet> Full Height
 from the menu, then click in your plan to place a full height cabinet at that location.
- Click the Select Objects button, then click on the cabinet to select it and click the Open Object
 edit button.
- On the General panel of the Full Height Cabinet Specification, specify the desired Width, Height and Depth of the cabinet. In this example, a height of 109 1/8" is used, as this is the ceiling height in this closet.
- On the Front panel of the dialog:
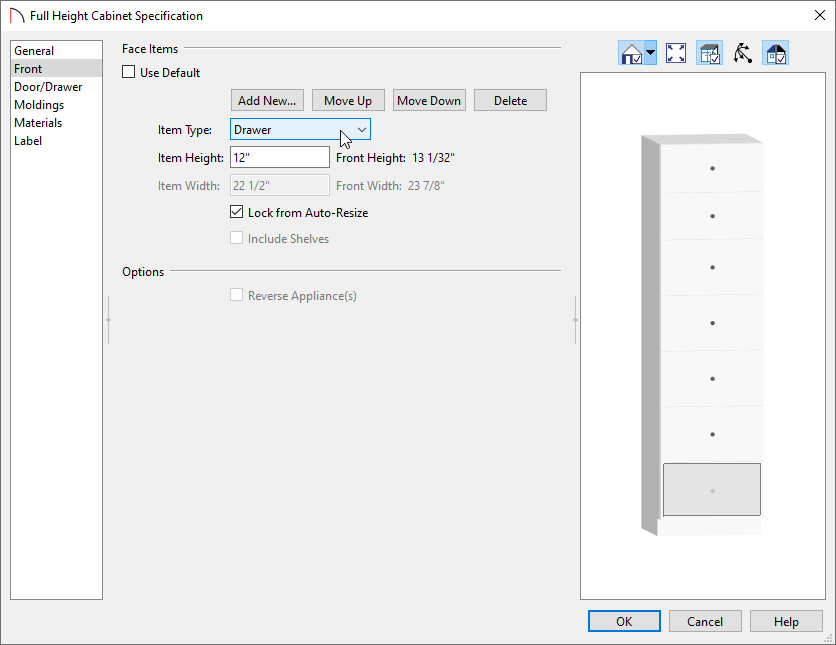
- Click on the top door in the preview image of the cabinet on the right side of the dialog and notice that the options in the Face Items section on the left become enabled.
- Click the Item Type drop down arrow and select Drawer from the list. The preview updates to reflect your change.
- Specify the desired Item Height for the top drawer in the bank. Press the TAB key on the keyboard to update the preview.
- Click on the bottom door and repeat this process.
- Click on the empty space beneath the second drawer and repeat the process again, until the entire cabinet front is filled with drawers.
- When you are satisfied with your cabinet, click OK to close the dialog and apply your changes.
- Click on the top door in the preview image of the cabinet on the right side of the dialog and notice that the options in the Face Items section on the left become enabled.
- You can combine any of the options in the Item Type drop-down list. The cabinet in this final example has:
- A 24" high Double Door on top
- A 36" high Shelves item beneath the Double-Door
- A 6" high Drawer a 12" high Drawer and an 15 7/8" high Drawer
- A 24" high Double Door on top
- Select 3D> Create Camera View> Full Camera
 from the menu, then click and drag a camera arrow towards the cabinet you just created to see the results so far.

- To make a copy of the full height cabinet you have customized, select File> Close View to return to floor plan view.
- Click the Select Objects button, then click on the cabinet to select it and click the Copy/Paste
 edit button.
- Click in the drawing area to place a copy of the cabinet.
- If you would like to place more than one copy, use the Sticky Mode
 edit button, then click to place as many copies as you wish. When you are finished making copies, click the Select Objects button.

- Click in the drawing area to place a copy of the cabinet.
To place shelves and partitions
Shelves and partitions can be effectively arranged in a section view.
- Select 3D> Create Camera View> Elevation
 from the menu, then click and drag a camera arrow perpendicular to the wall that you would like to build shelves on.
- Select Build> Cabinet> Partition
 from the menu then, click in an empty space on the wall to place a partition at that location.

- Don't worry about placing it exactly where you want it now - it can be moved and resized in a moment.
- If you cannot find an empty space along the wall large enough to accommodate the partition, return to floor plan view, place it in an empty space in the room and then, using the edit handles, move it to the desired location. When you are finished, return to the section view.
- Don't worry about placing it exactly where you want it now - it can be moved and resized in a moment.
- Click the Select Objects button, then click on the partition to select it. Using the edit handles, move it to the desired location and resize it as needed.
- If the partition bumps into other objects as you try to move it, press the Ctrl/Command key on your keyboard as you move it to override any restrictions.
- If you need additional partitions of the same size, click the Copy/Paste edit button and, as before, click in an empty space on the wall to place your copy at that location. The partition could then be moved into position.

- When your partitions are in place, select Build> Cabinet> Shelf
 from the menu, then click in an empty space along the wall to place your first shelf.

- Move it into position and resize it as necessary.

- As with a partition, if you need additional shelves, use the Copy/Paste edit button to create them as described in step 5.
- Repeat the steps to place shelves and partitions described above along each wall in the closet that needs shelving.

To accessorize the closet
To help clients visualize how the space can be used, place objects from the Library Browser onto the shelves.
In this example, clothing symbols are stacked on the shelves and positioned on hanging rods.
Other objects from the Library Browser that you can use to accessorize a walk-in closet include:
- Vanities, dressing tables or dressers.
- Floor or wall mirror.
- Baskets or storage bins.
Lighting plays a very important role in any room - including custom closets. A selection of different ceiling mounted, wall mounted, and free-standing light fixtures are available in the Library Browser.
Select 3D> Create Camera View> Full Camera to see the results.