Creating a Mulled Window
Reference Number:
KB-00759
Last Modified:
September 6, 2022
This article also applies to the following legacy products:
Pro | Architectural | Suite
Pro | Architectural | Suite
QUESTION
How can I create a mulled window unit?
ANSWER
A window unit composed of multiple smaller windows is often referred to as a mulled window. Windows of different types can be placed together to form a wide variety of attractive designs.
To create a mulled window
-
Select File> Open Plan
 from the menu to open a plan in which you would like to create a mulled window unit, or select File> New Plan
  to open a new, blank plan.
-
Before windows can be created, walls must be in place. Select Build> Wall> Straight Exterior Wall
 from the menu to draw the exterior walls of your plan.
-
Next, select Build> Window> Window
 from the menu, then click on an exterior wall to place a window at that location.
-
To see the window in 3D, select 3D> Create Camera View> Full Camera
 from the menu, then click and drag a camera arrow on the exterior of your floor plan, facing the window created in step 3.
In Home Designer Pro, navigate to 3D> Create Perspective View> Full Camera instead.

- Windows can be created and edited in both floor plan and 3D views. With the Select Objects
 tool active, click on the window to select it, then click the Open Object
  edit button.
- In the Window Specification dialog that displays:
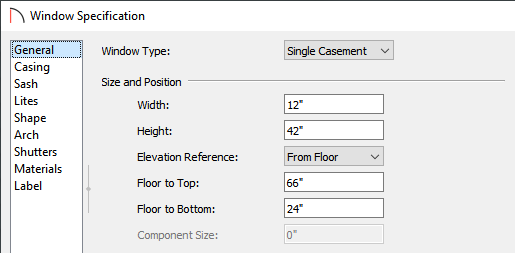
- On the General panel, choose a Window Type, and set the Width, Height, and Floor to Top/Bottom values.
In this example, a Single Casement window is chosen with the Width set to 12", the Height set to 42", and the Floor to Top set to 66".
- On the Casing panel, set both the Interior and Exterior Width to your liking.
In this example, a value of 1 1/2" is set.
- On the Lites panel, set the number of Lites Across and Lites Vertical.
In this example the Lites Across is set to 1 and the Lites Vertical is set to 4.
- On the Materials panel, set the Sash (Exterior) and Trim (Exterior) to the material or color of your choice.
- Click OK to close the dialog and apply your changes to the window.
- On the General panel, choose a Window Type, and set the Width, Height, and Floor to Top/Bottom values.
-
Next, select the window and click the Copy/Paste
 edit button. Your cursor will now display the Copy/Paste
  icon. Click on an empty space on the wall to place to place an additional window. Perform this procedure until there are a total of 4 windows.

-
Click on the second window to select it, then click the Open Object edit button.
-
In the Window Specification dialog:
- On the General panel, set the Width to your liking. This will serve as our middle component.
In this example, the Width is set to 24".
- On the Lites panel, set both the Lites Across and Lites Vertical to 1.
- Click OK to close the dialog and apply your changes to this window.
- On the General panel, set the Width to your liking. This will serve as our middle component.
-
Click on the second window to select it and use the Move
 edit handle to move the window so that it bumps against the first window. In the same way, move the third window over to bump against the second window.

-
Click on the fourth window to select it and click the Open Object edit button.
-
In the Window Specification dialog:
-
On the General panel, set the Width and Height to your liking. This will serve as the top window component that will span the full width of the unit.
In this example, the Width is set to 52" and the Height is set to 10".
-
On the Lites panel, set the Lites across to 5 and Lites vertical to 1.
-
Click OK to close the dialog and apply your changes to this window.
-
- Click on the fourth window to select it, then use the Move edit handle to move the window above the other three. Leave a space between the windows and release.
To move an object such as this window through obstructions such as the ceiling in this plan, hold the Ctrl/Command key on your keyboard, then move the object with the Move edit handle.
-
Finally, use the Move edit handle to drag the window down so it bumps the top of the other three windows.

The Chief Architect Premier software also has the ability to mull together multiple window components into a single unit so that it can be added to the User Catalog for future use. If you're interested in upgrading, please contact our Sales team.
Related Articles