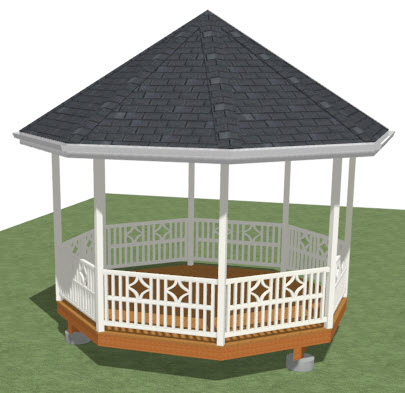
Drawing an Octagonal Structure with Railings
Pro | Architectural | Suite
QUESTION
I am trying to draw a deck structure in the shape of an octagon and I want all eight sides to be of equal length. I am having a difficult time accomplishing this as every time I adjust the length of one wall, another wall changes.
How do I draw an octagon shaped structure with equal sides?
ANSWER
Creating an octagonal structure with railings is easy to accomplish using the Polygon Shaped Deck tool.
The Chief Architect Premier version of the software also has a Polygon Shaped Room tool, which automatically creates walls, instead of railings.
To create an octagonal structure with railings
- Select Build> Railing and Deck> Polygon Shaped Deck
 to display the New Polygon Shaped Deck dialog.

- Choose your desired Define by setting.
In this example, we have selected Side Length.
- Set the Number of Sides and either the Side Length or Radius.
In this example, 8 sides are specified, with each side having a length of 6' (72").
- Leave the check next to Include Railing if you would like physical deck railings to be generated. If you uncheck this box, invisible railings will generate to form the octagonal structure.
- Choose your desired Define by setting.
- Once these values are set to your liking, click OK, then simply click in plan view at the location you want to place the polygon shaped deck.
To customize the railings
- Once you have placed the deck, use the Select Objects
 tool to click on one of the deck railings, then select the Open Object
  edit button.
- In the Deck Railing Specification dialog that displays:
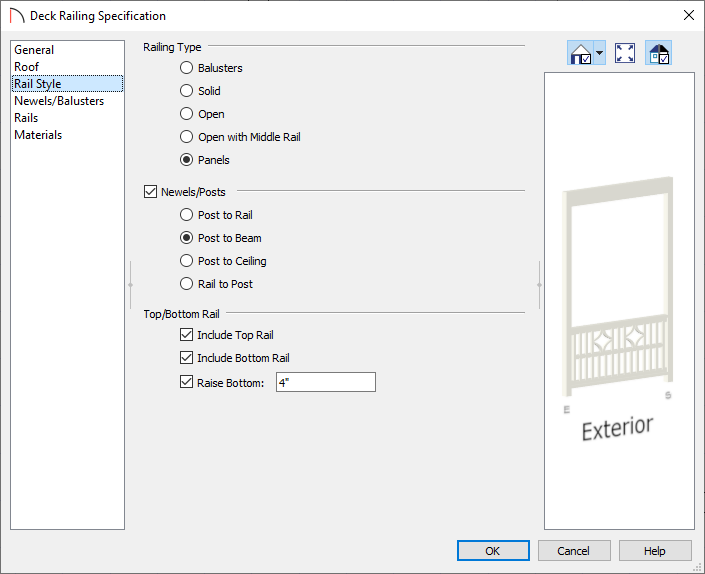
- Select the Rail Style panel, choose your desired Railing Type, how you would like the Newels/Posts to generate, as well as other properties for the rails.
In this example, we have selected the Panels option and have selected the Post to Beam option.
- On the Newels/Balusters panel, you can specify the Height of the railing, properties for Newels/Posts and Balusters, as well as Panels, if chosen.
In this example, we selected the Library button next to the Panel Type and selected the Acapulco panel option located in the library by navigating to Home Designer Core Catalogs> Architectural> Fences & Railings> Decorator.
- On the Rails panel, specify the Width and Height for each rail, as well as the Beam, if necessary.
- On the Materials panel, choose the appropriate materials for each component of your railing.
- Select the Rail Style panel, choose your desired Railing Type, how you would like the Newels/Posts to generate, as well as other properties for the rails.
- Click OK to apply the changes. Repeat this procedure for each of the subsequent railings.
Note: You can also group select railings and change their properties all at once. To learn more, please see the "Group Selecting Objects" resource in the Related Articles section below.
By default, a roof does not generate over a deck room. However, you can tell the program that you do want a roof over this area by following the instructions below.
To generate a roof over the structure
- Using the Select Objects tool, click inside of the octagonal room enclosed by railings, then click on the Open Object edit button.
- On the Structure panel of the Room Specification dialog that displays, place a check in the Roof Over This Room box, then click OK.
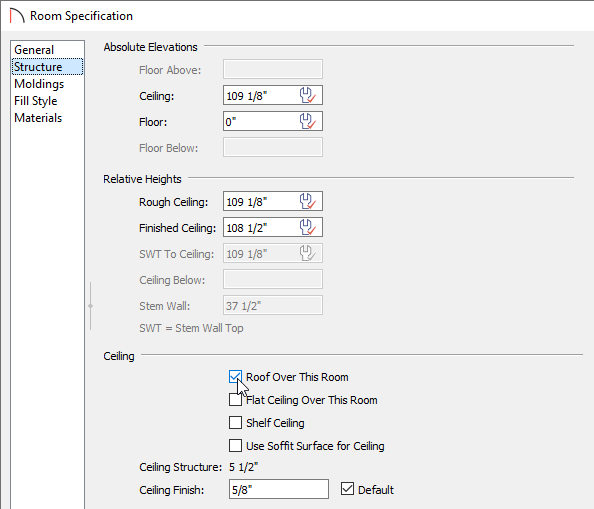
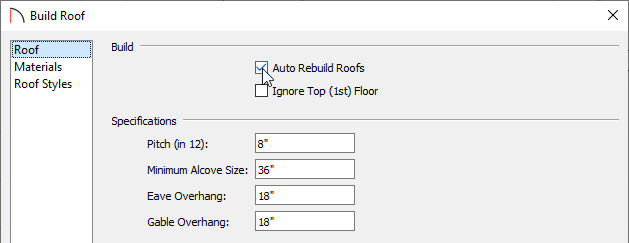
- If Auto Rebuild Roofs is enabled, your structure will update to have a roof over it, based on the pitch and material settings in the Build Roof dialog.
If the roof doesn't generate or update, navigate to Build> Roof> Build Roof from the menu, check the Auto Rebuild Roofs box located on the Roof panel, then click OK.
- Take a Camera
 view to see the results.