Editing the Shape and Size of the Terrain Perimeter
Pro | Architectural | Suite
QUESTION
How do I adjust the shape and size of my terrain perimeter to accurately reflect my lot?

ANSWER
The Terrain Perimeter is defined as a closed polyline defining the boundary of the terrain that generates in 3D views and of the contour lines that generate in floor plan view. As such, it can be edited in the same way as any basic closed polyline.
Below is an image with the edit handles you may want to familiarize yourself with before editing your terrain perimeter.
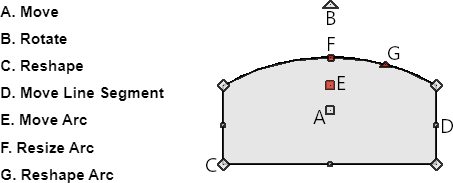
If you're unfamiliar with the functions of these edit handles, select Help> Launch Help, then search for "Editing Closed Polyline-Based Objects".
To change the shape of your Terrain Perimeter
- If a Terrain Perimeter is not present in your plan, select Terrain> Create Terrain Perimeter
 from the menu. By default in many template styles, a 50' x 100' line square Terrain Perimeter will be created.
- If necessary, navigate to Window> Zoom Out
 to zoom out so that the Terrain Perimeter is visible.
- Using the Select Objects
 tool, select an edge of the Terrain Perimeter that you want to edit.
- Once selected, the edit tools for the Terrain Perimeter object become available.
- The Add Break
 tool will create a new corner edit handle at the location along an edge where you click.
If you click and drag one of the edit handles on either side of the partial break, the edge moves at a right angle to itself and another edge forms, connecting the moved edge with the one on the other side that does not move.
- The Change Line/Arc
 tool will change the selected segment from a line to an arc or vice versa
- The Add Break
Once you have approximated the shape of your lot, you are ready to change its size.
To change the dimensions of your Terrain Perimeter
- Using the Select Objects tool, click on the edge of your Terrain Perimeter that you want to adjust, then click on the Open Object
 edit tool.
- On the Selected Line panel (or Selected Arc panel, if the selected segment is an arc) of the Terrain Specification dialog that displays:
- Enter in the desired Length (in inches or millimeters) of the selected line segment of your Terrain Perimeter.
-
Enter in the desired Angle (in degrees) of the segment.
Note: In Home Designer Professional, if you have values in a different format than degrees, such as in Minutes and Seconds or in a Bearing, you can select the Number Style button to change how to enter in the Angle value.
- Enter in the desired Length (in inches or millimeters) of the selected line segment of your Terrain Perimeter.
- Once you have completed adjusting the properties of this first line or arc segment, click OK.
- Continue this same procedure, selecting the next line to edit in a clockwise fashion until you adjust all of the lines that make up your Terrain Perimeter.