Displaying Detached Buildings at Different Elevations
Reference Number:
KB-00564
Last Modified:
July 23, 2021
This article also applies to the following legacy products:
Pro | Architectural | Suite
Pro | Architectural | Suite
QUESTION
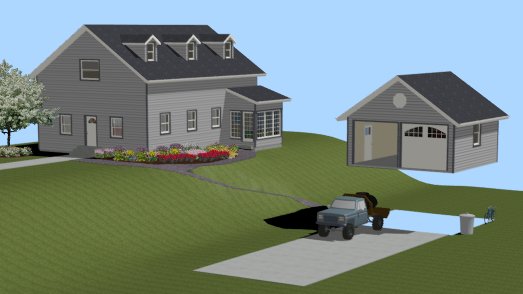
I have two separate buildings on my lot which are at different elevations, however, when I create them and take a camera view, one of my buildings appears to be floating in the air, or sunk into the ground.
How can I do this correctly in my plan so that both buildings display accurately?

ANSWER
Adjusting your Floor and Ceiling Height values in the structure that is displaying incorrectly will easily allow you to have both structures display correctly.
To adjust floor and ceiling heights
- Select 3D> Create Camera View> Full Overview
 to create an overview of the plan where the two structures are not displayed correctly.

- Select Window> Tile Vertically
 to display both views in a vertical orientation, so that as you make changes in your 2D floor plan view, you can see how they change the display in a 3D camera view.
- In your 2D floor plan view, use the Select Objects
 tool to select a room in the structure that is displayed incorrectly.
For the purposes of our example, this is the detached garage, which is only a single room.
- Click on the Open Object
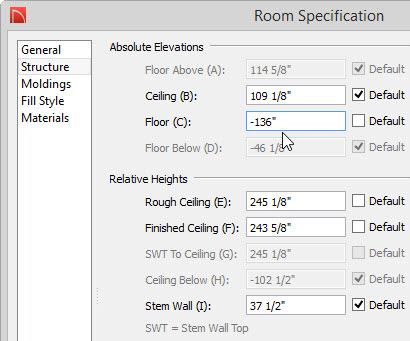
 edit button to display the Room Specification dialog.
- On the Structure panel, adjust the Floor (C) and Finished Ceiling Height (F) values to accurately lower the height of the building.

For the purposes of our example, there is a terrain elevation difference of approximately 10'.
- Click OK once you have applied the changes and see the 3D camera view update.
- If your structure has multiple rooms, repeat this process for the remaining rooms.
Note: If Auto Rebuild Roofs is unchecked in in the Build Roof dialog, you will need to rebuild the roof to have it display at the correct height for any rooms that have been modified.