Creating a Layout in Home Designer
Pro
QUESTION
I am ready to create plan sheets for my design. How can I use the layout feature to accomplish this?

ANSWER
Home Designer 2026 and Home Designer Pro 2025 and prior use two file types: plans and layouts. In a plan file (.plan), we design a 2D and 3D model of a structure, and in a layout file (.layout) we arrange views of that model as well as text and other annotations to produce professional quality construction documents.
To start a new layout in Home Designer
- Select File> New Project
 to create a new project.
When using Traditional File Management in Home Designer 2026 and newer versions, or when using Home Designer Pro 2025 and prior, select File> New Layout instead. Once you have the layout created, select File> Save As
  and save the layout file in the same location as your plan that you create construction documents for. Give the layout file a short, descriptive name that describes its contents - for example, "Jones Remodel.layout".
In Home Designer 2026 and newer, the file that opens will be based on the template specified in Preferences. For more information on creating and using layout templates please see the Related Articles section.
You can also add a layout to an existing project by navigating to the Project Browser, right-clicking on your project, and choosing "Add New Layout". Each project can contain only a single layout file, and if you try to add a new layout to a project that already contains, one you will be met with a message.
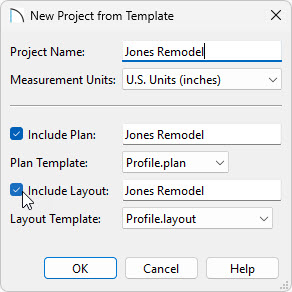
- Specify a Project Name and choose your Measurement Units.
- Check the Include Layout box, choose a Layout Template using the drop-down, make any other desired adjustments, then click OK.
- Select File> Print> Drawing Sheet Setup
 .
.
- In the Drawing Sheet Setup dialog that displays:
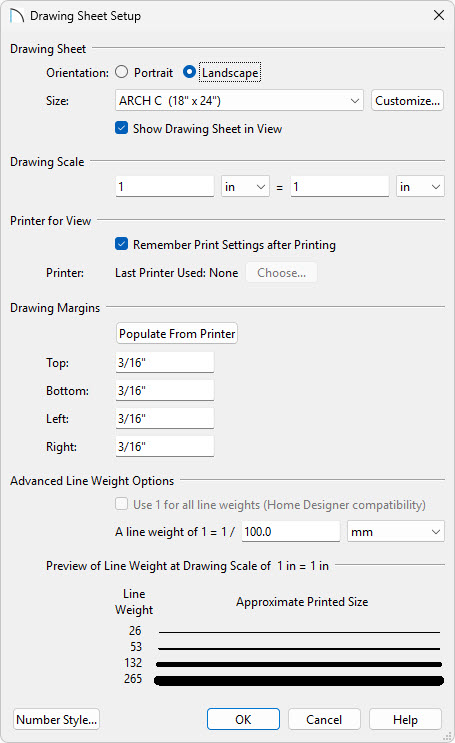
- Set the Drawing Sheet Orientation and Size.
- The Drawing Scale should be left at the default 1 in = 1 in for Imperial layouts, or 1 mm = 1 mm for Metric layouts.
- The Line Weight Scale should remain unchanged at 1 = 1/100 mm.
- Click OK to close the dialog and apply your changes.
- Set the Drawing Sheet Orientation and Size.
- Select File> Save
 to save your file.
To create a custom title block and border
A title block and border are created using CAD and Text objects. You can modify the existing title block and border or delete it and redraw it yourself. You can also include images, such as a company logo.
Layout files consisting of up to 5 pages can be created. With multi-page layouts, it's ideal to modify the title block and border on Page 0 of the layout, as this is considered a layout template page. Everything that is generated on a layout template page will be replicated on each additional page of the layout.
To learn more about layout borders and title blocks, please see the Layout Tutorial in the program's Help, as well as in the User's Guide, which are available by accessing the program's Help menu. To learn more about resizing the layout title block and border, please see the Related Articles.
Once you have your title block and border configured to your liking, be sure to Save your work. You are now ready to send views from your plan to the layout.
To send views to the layout
- Open the view you want to send to the layout, such as a plan view, Cross Section/Elevation view, or a Perspective Camera, then select File> Send to Layout
 .
.
- In the Send to Layout dialog that displays next:
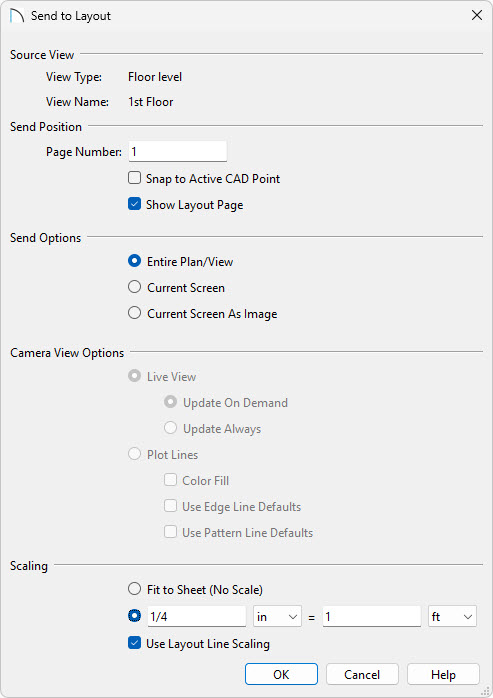
- Choose the Page Number (between 1 and 5) that you would like to send the view to.
If you require more than 5 pages within a single layout file, consider upgrading to Chief Architect Premier. For information about upgrading, please see contact our Sales team.
- Ensure that Show Layout Page is checked.
- Select the desired Send/Camera View Options as well as the Scaling.
For more information about these various settings, click the Help button at the bottom of the dialog.
- Click OK to send the view to the layout page.
- Choose the Page Number (between 1 and 5) that you would like to send the view to.
- Once a view has been sent to layout, it can be selected and repositioned as needed. The extents of a layout view can also be cropped by moving the edges of the view box using its edit handles.
- If the view is too large to fit the information that you want to show on the layout page, Delete
 the view and send it to layout again at a smaller scale.
- Multiple views can be sent to a single layout page. If you would like to send additional views and there is space to do so:
- Click on the tab for the plan view window or select the plan view from the bottom of the Window menu to return to that view.
- Create a new view to send to layout, then repeat steps 3 - 5, above.
- Click on the tab for the plan view window or select the plan view from the bottom of the Window menu to return to that view.
- Add any additional text, CAD, or imported images to the layout page.

-
Save your work, and when you are finished, select File> Close View to close the current layout file.