Modifying Wall Thickness
Pro | Architectural | Suite
QUESTION
I would like to adjust the thicknesses of my walls to accurately reflect existing conditions in my home. How can I accomplish this in Home Designer?
ANSWER
The initial thickness of a wall is determined by its wall type, and how you will adjust the thickness of walls will depend on the version of the software you are using.
In Home Designer Suite, the thickness of a wall can only be changed within the Wall Specification dialog. However, in Home Designer Architectural and Pro, it's recommended to adjust the thickness of a wall by editing the individual wall layers located within the Wall Type Definitions dialog, allowing you to accurately reflect not only the thickness, but the rest of the makeup of the wall as well.
To adjust the thickness of a wall using the Wall Specification dialog
- Select Build> Wall> Straight Exterior Wall
 and click and drag out a single wall in your 2D floor plan view.
- Once placed, use the Select Objects
 tool to select the wall, then click on the Open Object
  edit tool to display the Wall Specification dialog.
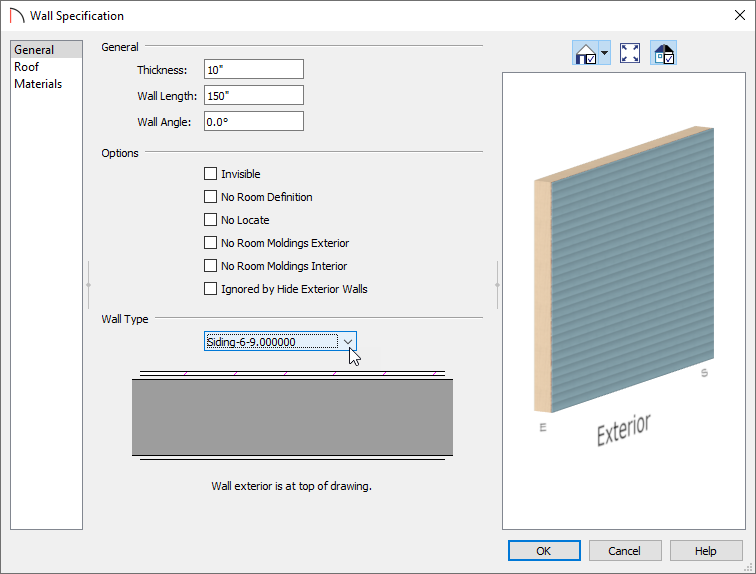
- On the General panel, enter in a new value in the Thickness field.

Note: When a wall's thickness is changed:
- A copy of the wall type is created with the same name but appended with a number equal to the thickness of the structural layer, and that new type is assigned to the wall.
In our example, this means that the Wall Type is now a Siding-6-9.000000.
- The change in thickness will be applied to the new wall type's structural layer.
- The structural layer must be at least 1/16" thick.
- If a wall type's thickness is modified, the wall will resize about the outside edge of its structural layer.
- A copy of the wall type is created with the same name but appended with a number equal to the thickness of the structural layer, and that new type is assigned to the wall.
- Once you have entered in the desired value, click OK to apply the change, and see the wall's thickness update to the value that you entered.
- Once you have modified this wall, you can open the specification dialog for any other walls you would like to change, and select the new Wall Type from the drop-down menu.
Recall that in our example, this wall type was named Siding-6-9.000000.
In Home Designer Architectural and Home Designer Pro, you can also manually adjust the thickness of a wall by editing an existing wall type and specifying its Wall Layers appropriately.
Every wall in a plan is assigned a wall type, and its 2D representation, default materials, and framing width are specified by its Wall Type Definition.
It is important to understand that the Wall Type Definitions dialog is used to redefine existing wall types in the current plan file, so changes made to an existing wall type definition affect all walls in the current plan using that wall type. Walls in other plan files are unaffected.
To adjust the thickness of a wall using the Wall Type Definitions dialog
*Applies to Home Designer Architectural and Home Designer Pro
- Select Build> Wall> Define Wall Types
 to open the Wall Type Definitions dialog.
You can also click the Define button on the Wall Types panel of the Wall Specification or the Wall Defaults dialogs.
- At the top of this dialog, we can see the drop-down menu of existing Wall Types in the plan.
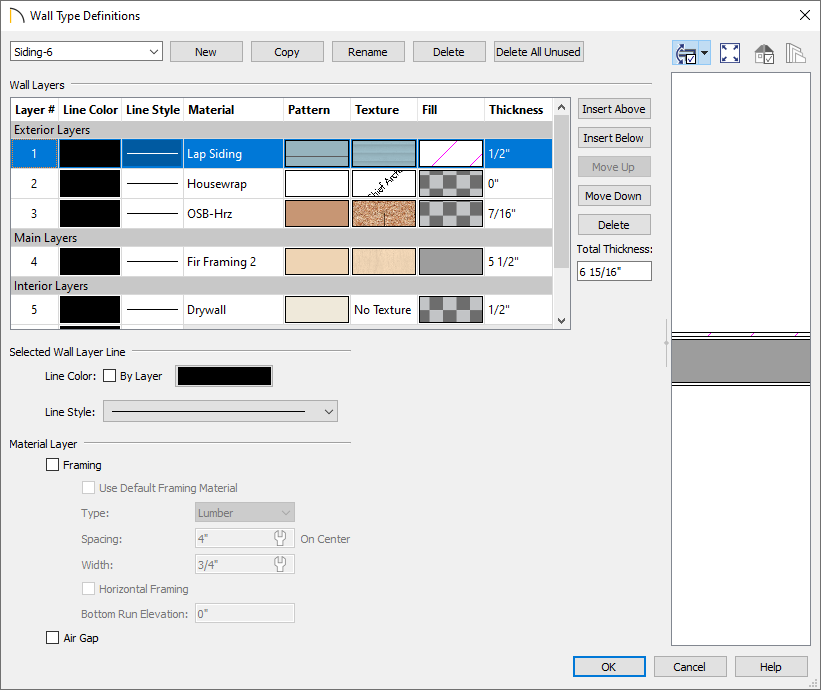
- Select a Wall Type you wish to edit, then click Copy. Change the name of the new copied Wall Type, if needed.
- After copying the Wall Type that you want to edit from the drop-down menu, you can Insert or Delete layers.
- You can also specify each Layer's Thickness so that the Total Thickness equals the thickness needed for the wall, as well as set that Layer's Material and Fill Style.
If you change the Total Thickness value, the program automatically changes the thickness of the Main Layer to account for the difference.
- In most circumstances, the structural layer should be located under Main Layer, particularly when the wall is a framed type, because information such as how platforms generate, floors align, baselines are placed, how dimensions locate, and how the framing is built all rely on the Main Layer.
This is why creating your wall type definitions accurately beforehand and specifying the Main Layer is very important.
Make sure that the structural layer is located under Main Layers.
While placing other layers under Main Layer is possible and may be preferable in certain rare situations, in most cases you will encounter problems with wall connections and framing.
- For any wall layer that needs to be framed, use the Framing checkbox and specify the Type, Spacing, Width, and if it is Horizontal Framing.
- For additional information about the settings in this dialog, click on the Help button located at the lower right corner of the dialog box.
- After copying the Wall Type that you want to edit from the drop-down menu, you can Insert or Delete layers.
- Once all desired changes have been made, click OK.