Specifying Roof Pitches
Pro | Architectural | Suite
QUESTION
When I set the pitch for the roof in the Build Roof dialog, it only lets me set one pitch. How do I tell the program to build a higher, or lower, pitched roof over part of my design?

ANSWER
The pitch for each individual wall in your plan can be specified on the Roof panel within the Wall Specification dialog. Most of the pitches for your roof are likely the same though, with only a few being different, so this is the pitch you'll want to use in the Build Roof dialog.
To set the overall pitch
- Within your plan, select Build> Roof> Build Roof
 .
.
- On the Roof panel, set the overall Pitch (in 12) for your plan that most of your roof planes need to be.
For the purposes of our example, we will set this pitch to 12" for an Imperial plan, or 45° in a Metric plan.
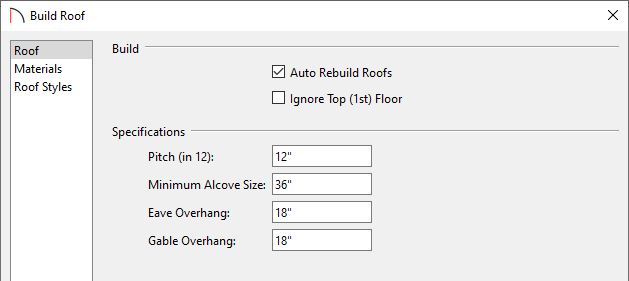
- Click OK to apply this change.
Once you've set your overall pitch for the roof planes, you're ready to go around on a wall-by-wall basis and change the necessary walls that you don't want to follow the default setting.
To adjust the pitch over a single wall
- Using the Select Objects
 tool, click on the wall which has a higher, or lower pitch than what you set in the Build Roof dialog, then click on the Open Object
  edit button.
- On the Roof panel, specify the desired Pitch for the roof plane that will build over this wall.
For the purposes of this example, we will set the pitch to 6" in an Imperial plan, or 26.5° in a Metric plan.
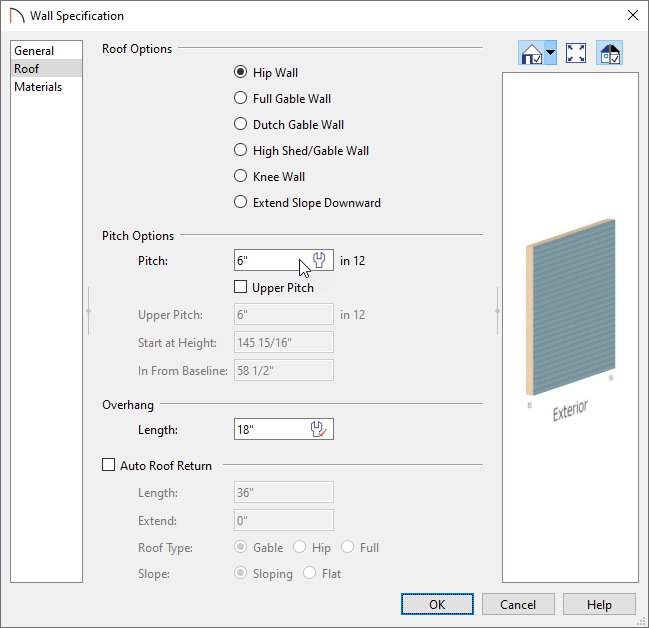
- Click OK to apply the change.
- Repeat this process for any other walls in your plan which need to have a pitch that varies from the default set in the Build Roof dialog.
In some cases, such as in a gull wing or roof porch area, you may need to be able to set both an upper and a lower pitch for the roof
To set an upper and lower pitch
- As described in the steps above, use the Select Objects tool, click on the wall which has a higher, or lower, pitch than what you set in the Build Roof dialog, then click on the Open Object edit button.
- On the Roof panel, specify the desired lower Pitch for the roof plane that will build over this wall or railing.
- Check the Upper Pitch box, then specify an Upper Pitch value.
- Specify where to Start the upper pitch - by specifying at what Height to transition from the lower to the upper pitch, or the measurement In From Baseline where the transition should occur.
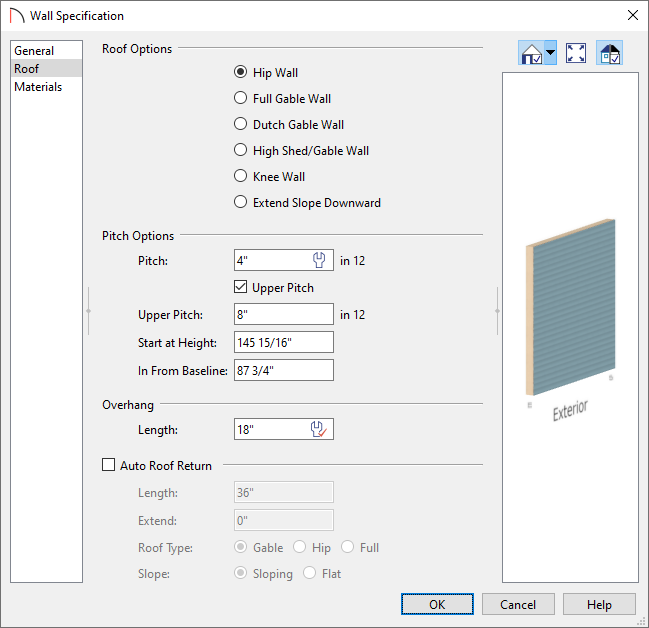
- Click OK to apply the change.
- Repeat this process for any other walls in your plan which need to have a pitch that varies from the default set in the Build Roof dialog.