Troubleshooting why Roof Planes Fail to Generate
Pro | Architectural | Suite
QUESTION
When I attempt to generate an automatic roof, no roof planes are created. Why is that happening and how do I fix it?
ANSWER
There are several reasons why a roof might not be produced in a given plan. We will discuss the most common reasons why a roof would not be generated below including room definition, structural specifications and roof baseline polylines.
To verify room definition
- When walls are drawn to enclose an area, the program will recognize that area as a room.
- You should be able to click in a room in floor plan view using the Select Objects
 tool and select it. The room will change in color once selected and the status bar at the lower right will show Room as the current selection.
- If you're not able to select a room and highlight it, there is probably a gap somewhere along the perimeter walls. Carefully examine the walls, particularly the corners, and make any adjustments needed to make sure they are properly connected.
If you are able to select the room or rooms in your plan, make sure that they are set to have roofs built over them.
To check structural room specifications
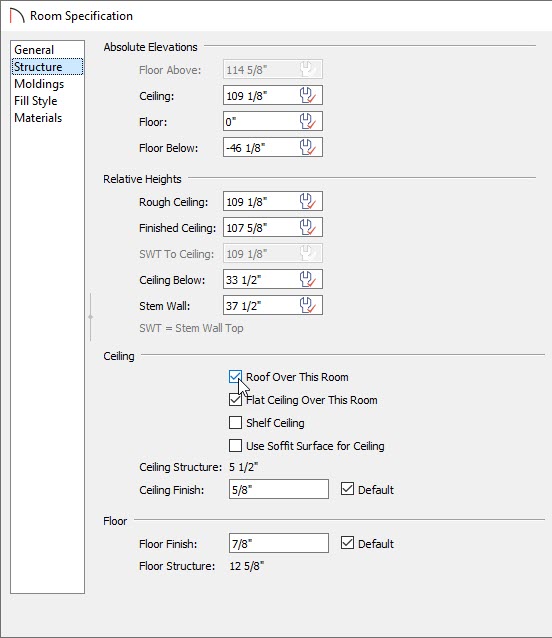
- With a room selected, click the Open Object
 edit button to display the Room Specification dialog.
- On the Structure panel of the Room Specification dialog that displays, make sure there is a check beside Roof Over This Room.
To reset the Roof Directives in Walls to match the default settings
- Select Edit> Reset to Defaults from the menu.
- In the Reset to Defaults dialog, set the Reset Scope to All Floors.
- Place a check in the boxes next to:
- Floor Heights
- Ceiling Heights
-
Roof Directives in Walls
- Click the OK button to apply the changes and restore these values back to their defaults.
To delete gable lines in Home Designer Architectural and Home Designer Pro
Home Designer Architectural and Home Designer Pro have a Gable/Roof Line ![]() tool which can be used to automatically generate a gable above the bearing wall of a hip roof plane such as if a wall break would be required in the same location as a door or window, where a wall is not present, such as across the front of an alcove, or over a bay, box, or bow window.
tool which can be used to automatically generate a gable above the bearing wall of a hip roof plane such as if a wall break would be required in the same location as a door or window, where a wall is not present, such as across the front of an alcove, or over a bay, box, or bow window.
If you have tried to use a Gable/Roof Line in a different area than those described above, it may be affecting the generation of the roof planes. Using the Select Objects tool, you can select the Gable/Roof Line then Delete ![]() it.
it.
To delete roof baseline polylines in Home Designer Pro
In Home Designer Pro, an unwanted roof baseline polyline may prevent the roof from generating properly.
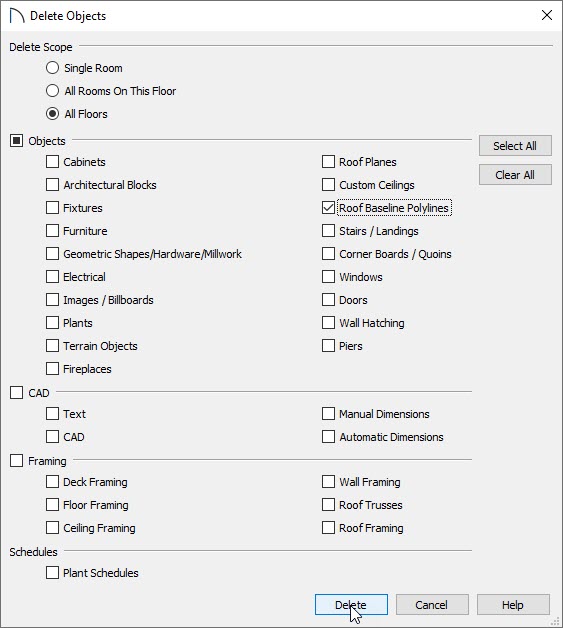
- Select Edit> Delete Objects
 from the menu.
- In the Delete Objects dialog, set the Delete Scope to All Floors.
- Place a check in the Roof Baseline Polylines box, then select Delete.
- Lastly, rebuild your roof.
If you have set one or more rooms to be in a Roof Group other than zero, you can use the Reset to Defaults menu option to set them all back to zero.
To Reset Roof Groups in Home Designer Pro
- Select Edit> Reset to Defaults from the menu.
- In the Reset to Defaults dialog, place a check in the Roof Groups box, then click OK to reset all the rooms to Roof Group zero.
- Lastly, rebuild your roof.