Creating a Planting Bed
Pro | Architectural | Suite
QUESTION
I would like to create a custom garden bed. How can I accomplish this?

ANSWER
The Terrain Feature tools allow you to create a wide variety of custom planting designs. The following article describes how you can create a formal garden area with paths, multiple planting beds, and benches.
- Creating paths
- Creating planting beds
- Creating lawn edging
- Increasing the garden height and adding plants
To create paths
- Select Terrain> Feature> Rectangular Feature
 and click and drag in plan view to create a rectangle without worrying about its exact size or shape as it can be edited after it is drawn.
Note: If the Terrain Feature tools are greyed out it means that a Terrain Perimeter is not present. To create a terrain perimeter, navigate to Terrain> Create Terrain Perimeter.
- Once placed, click on the rectangular terrain feature to select it, then click the Open Object
 edit button to display the Terrain Feature Specification dialog.
- On the General panel, specify the Terrain to Top and Thickness.
- On the Materials panel, select the Terrain Feature subheading and then click the Select Material button.
Browse through the Materials library category and select a material for your garden paths, such as "Large Gravel".
- Click OK to close the dialog and apply your changes.
- On the General panel, specify the Terrain to Top and Thickness.
- With the terrain feature still selected, use the edit handles and temporary dimensions to resize the feature to the correct size for your path.
For this tutorial, the path will be 12' long and 2' wide.
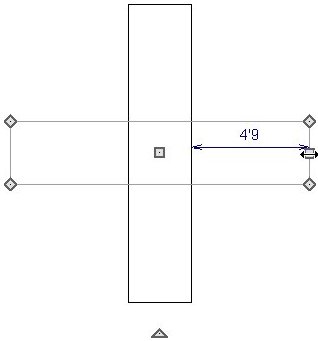
- To create a second path identical to this one, select the path, click the Copy/Paste
 edit button, then click again in plan view.
Use the triangular Rotate edit handle to rotate the feature 90 degrees, then use the Move
  handle to position the path so that it forms an intersection with the first one as demonstrated in the image below.
To create planting beds
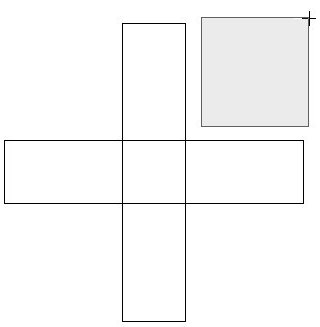
- Select Terrain> Feature> Rectangular Feature , then click and drag to create a square.
Again, don't worry about the exact size and shape as after the square is created, as you can use the edit handles to position and resize it precisely.
- Click and drag the outer corner handle of the square to reshape it into a triangle.
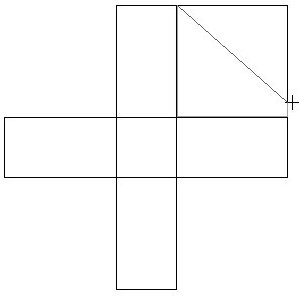
- Click on the triangle near its long outside edge to select it and then click the Change Line/Arc
 edit button to convert the edge from a straight line to an arc.
You can adjust the shape of the arc using the edit handles; but for this tutorial, the default arc will work well.
- With the feature selected, click the Open Object edit button to display the Terrain Feature Specification dialog.
- On the General panel, set the Terrain to Top and Thickness.
- On the Materials panel, browse and select a material for the planting bed surface such as "Bark - Mixed Hardwood".
- On the General panel, set the Terrain to Top and Thickness.
If you like the appearance of lawn edging, now is a good time to place some around this planting bed.
To create lawn edging
- Select View> Library Browser
 if the Library Browser is not already open, then browse to the "Brick Edging" located in the Landscaping Accents bonus catalog.
Bonus catalogs can be downloaded from the 3D library. For instructions on downloading library content, please visit the "Downloading and Updating Library Catalogs" resource listed in the Related Articles section below.
- With the "Brick Edging" selected, click in the plan to place a unit of edging.
- Select the edging and click the Open Object edit button to display the Millwork Specification dialog.
- Specify the size and material of the edging, then click OK to close the dialog.
For this tutorial, use the default size and "Sandstone(mauve)" material.
- Select the customized edging, click on the Copy/Paste edit button, then click on the Sticky Mode
 tool, which will allow you to paste as many copies of the selected item as you like.
Click in plan view to create as many brick edging pieces as you need and use their edit handles to rotate and move them into position.
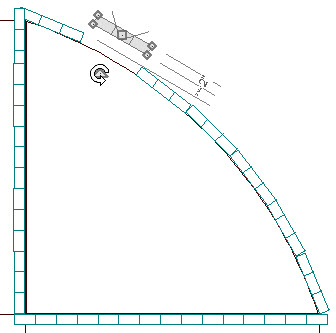
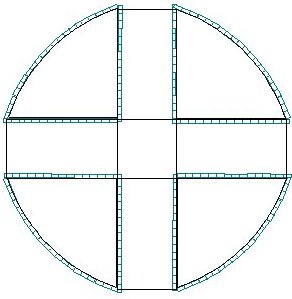
- When you have created a planting bed that suits your needs, group-select the entire planting bed and make copies of it for the other three corners of the garden by pressing the Shift key on your keyboard, then click and drag in plan view to draw a marquee around the planting bed, being careful to include all of the objects associated with the bed, such as edging.
- If you accidentally select an object that you do not want to copy, press the Ctrl/Command key and click on that object to remove it from the selection group.
- With the bed group-selected, click on the Copy/Paste edit button, then click in plan view to place a copy of the bed near another corner. Create additional copies to, then group-select each of these copies and use the Rotate and Move edit handles to reposition them.
The garden bed should now look similar to the image below.
- If you accidentally select an object that you do not want to copy, press the Ctrl/Command key and click on that object to remove it from the selection group.
To make this garden a bit more dramatic, elevate it a few inches above the surrounding terrain and add some plants to the design.
To increase the height of the garden bed and add plants
- Select Terrain> Modifier> Raised Region
 , then click and drag in plan view to draw a rounded region around the garden area.
- With the region selected, click the Open Object edit button and specify the region's Height to be a small number, such as 4".
- Next, select Terrain> Garden Bed> Round Garden Bed
 tool to create a terrain feature approximately the same size as the raised region and give it the same material as the garden paths on the Materials panel of the Terrain Feature Specification dialog.
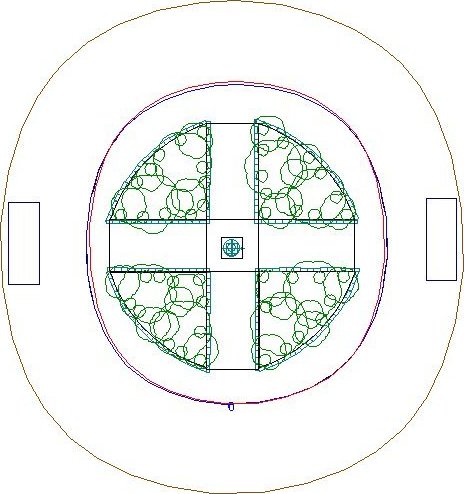
- An additional ring of ground covering can be added to further define the garden area and provide an area in which to place a couple of garden benches.
- To place plants in the garden, navigate to Terrain> Plant> Plant Chooser
 .
.
The "Plant" within the Library Browser contains an extensive plant catalog which you can browse through and select; and the Plant Chooser allows you to search for plants based on attributes that you specify.
Additional plants are available in a variety of bonus catalogs. To learn more, please see the "Downloading and Updating Library Catalogs" resource in the Related Articles section below.
- Furniture, recreational items, decorative pieces, and many other objects can also be found in the Library Browser as well as the 3D Library.
In the image below, bench objects are selected and placed on the left and right sides of the garden bed.
- To see what your garden looks like, select 3D> Create Camera View
 , then use either the Full Camera
  or Full Overview
  tools to create a 3D camera view.
In Home Designer Pro, navigate to 3D> Create Perspective View instead.