Creating Road Markings
Pro | Architectural | Suite
QUESTION
I would like to be able to draw road markings, or parking lot lines, in my design. How can I do that?

ANSWER
Creating road markings is easy using the Terrain Feature tool so long as you have a Terrain Perimeter present in your design.
To place road markings
- First you will need to download the Roads and Parking bonus catalog.
Note: For more information on obtaining bonus and manufacturer catalogs, please see the Related Articlessection below.
- In your plan, if you have not already created a Terrain Perimeter, you need to add one to Floor 1 by selecting Terrain> Create Terrain Perimeter
 .
.
- Draw in roads by using the Terrain> Road and Sidewalk> Straight Road
 tool.
tool.
- Once the road is created you can place the road markings from the Library Browser
 :
:
- If it's not already open, navigate to View> Library Browser to open the window.
- Browse to Home Designer Bonus Catalogs> Roads and Parking> Road Markings.
- Select a desired road marking, then click to place it on your road.
- If it's not already open, navigate to View> Library Browser
You can also create custom road markings using Terrain Features.
To create custom road markings
- To create a Terrain Feature go to Terrain> Feature> Rectangular Feature
 tool, then click and drag to create a rectangular Terrain Feature in your plan.
- Once created, select the Terrain Feature using the Select Objects
 tool and use the Open Object
  edit tool to display the Terrain Feature Specification dialog.
- Increase the Terrain to Top to 1" so that you will be able to see the feature when placed on a Road surface.
- Go to the Materials panel, and locate a material in the Select Material dialog that you want for your road marking.
Road marking materials can be found by navigating to Home Designer Core Catalogs> Materials> Landscaping and Roadways> Road Markings.
- Click OK when you have finished making these changes to apply them and return to your 2D floor plan view.
- Increase the Terrain to Top to 1" so that you will be able to see the feature when placed on a Road surface.
- Next, select the Terrain Feature and use its edit handles to resize it.
- You can use the Break Line
 and Change Line/Arc
  edit tools to change the shape of the Terrain Feature to create objects such as direction arrows.
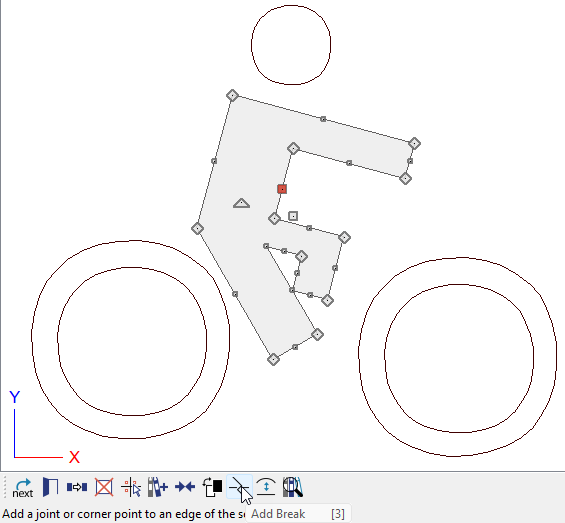
- To use the Break Line edit tool, select the Terrain Feature that you want to place a joint type of break in, and single click on the item to add the break.
- To use the Change Line/Arc edit tool, first select the straight side of the Terrain Feature that you want to turn in to a curve, and then click on the tool. This tool can also be used to turn a curved segment into a straight line.
- You can use the Break Line
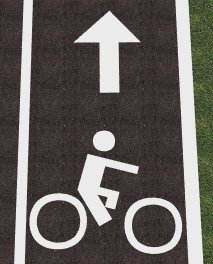
- You can also overlap Terrain Features and apply a different material to them as we did for the tires on our bicycle path road marker. The interior circle is a Terrain Feature assigned an asphalt material that matches that of the road on which we placed the marker.
- Finally, if you want to create copies of this Terrain Feature, use the Select Objects tool to drag a marquee around all of the Terrain Features, click the Copy
 edit tool, then click in the plan to paste the copy, which can then be moved and edited independently.
- The Copy and Paste
 functions can help save time when you need to create multiple road or parking lot features that will be the same.
After creating the first bicycle road marking shown above, we copied it to the other side of the street, and rotated it. Copying saved time and ensured that both of these Terrain Features were exactly the same.
- Finally, go to 3D> Create Camera View> Full Camera
 and click and drag towards your road marking to view the results and make any necessary adjustments.
In Home Designer Pro instead go to 3D> Create Perspective View> Full Camera and click and drag towards your road marking to view the results and make any necessary adjustments.
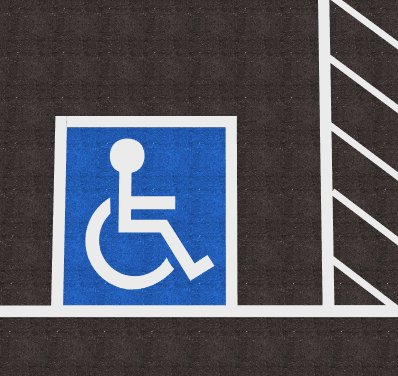
You can use this same procedure to create various road surface markings, basketball court lines, parking lot lines, handicapped parking space markers, etc.

Use the Blend Color With Materials tool to create an asphalt surface that has a different color, but maintains the asphalt texture, such as in the below image of a wheelchair accessible parking place. More information on this tool can be found in the Related Articles section below.