Creating a Bonus Room Above a Garage
Reference Number:
KB-00904
Last Modified:
December 12, 2025
This article also applies to the following legacy products:
Pro | Architectural | Suite
Pro | Architectural | Suite
QUESTION
I want to create a "F.R.O.G.", or Family Room Over Garage, in my plan. How can I do this in Home Designer?

ANSWER
This article describes how to create a living area above a simple detached garage; however, the same basic approach applies to attached garages as well, so the steps within this article can be used in various designs.
To create the 2nd floor
- Select Build> Wall> Straight Exterior Wall
 , then click and drag out walls to create a basic enclosed rectangular structure.
- Select Build> Floor> Build New Floor
 from the menu and in the New Floor dialog that appears, choose the Derive new 2nd floor plan from the 1st floor plan option, then click OK.
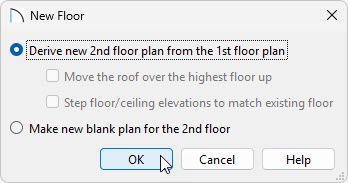
- The 2nd Floor Defaults dialog will appear. Click OK without making any changes to continue.
- On the second floor, using the Select Objects
 tool, click on the the left wall to select it, then click the Open Object
  edit button.
- On the Roof panel of the Wall Specification dialog that opens, select the Full Gable Wall option, then click OK to close the dialog and apply your change.
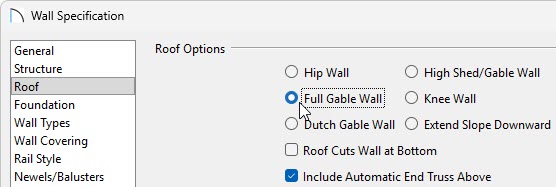
- Repeat this process for the opposing wall on this floor. If Auto Rebuild Roofs is enabled, you will notice a simple gable roof will be generated. The roof will be adjusted further in the next section.
To modify the area above the garage
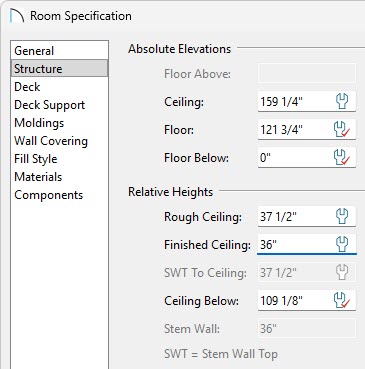
- Using the Select Objects tool, click in the area or room that is above the garage on the second floor to select it, then click the Open Object edit button.
- On the Structure panel of the Room Specification dialog that opens, lower the Finished Ceiling value to the height that you want the exterior walls to be above the floor, then click OK.
In this example, the height for this area is lowered to 36".
- Select Build> Roof> Build Roof
 from the menu to display the Build Roof dialog.
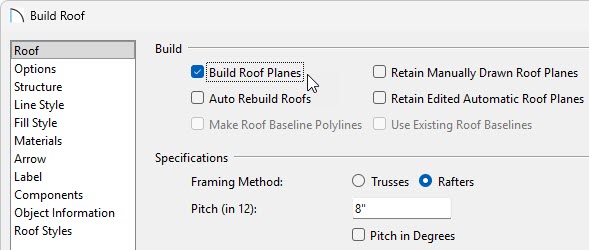
- Specify the desired Pitch (in12).
For the purposes of this example, we specified a roof pitch of 8 in 12.
- Uncheck the Auto Rebuild Roofs box, if available.
- If you are using Home Designer 2026 or newer, or legacy Home Designer Pro, check the Build Roof Planes box.
- Click OK.
- Specify the desired Pitch (in12).
- Select the second floor room that was edited previously and click the Open Object edit button to return to the Room Specification dialog:
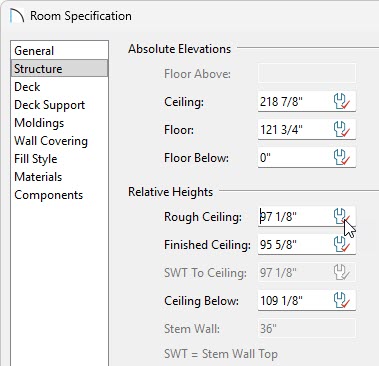
- Change the Finished Ceiling height from the 36" set previously back to the default height by selecting the wrench icon. A red check will display within the wrench icon signaling that a default value is now being used.
- Click OK. Dashed lines may now display on the floor plan, indicating where the ceiling planes intersect the roof.
- Change the Finished Ceiling height from the 36" set previously back to the default height by selecting the wrench icon. A red check will display within the wrench icon signaling that a default value is now being used.
- You can now place objects from the Library Browser
 to finish customizing your plan.
- Finally, take a Camera
 view of the interior to see the results.

Related Articles